 What you will learn
- Setting up a GitHub Workflow
- Adding steps for image build and upload
 Prerequisites
- Development experience
- Conducted the Building the Workspace with Github Actions How-to
- Access to CoreMedia GitHub, Nexus, and NPM repositories
 Target Audience
This guide is for Developers, DevOps Engineers.
Table of Contents
Introduction
In Building the Workspace with GitHub Actions you learned how to build the CoreMedia workspace with GitHub Actions. However, what you really want is to produce artifacts that can be deployed on servers.
CoreMedia uses Docker as the containerization approach, which has many advantages. For example:
-
Consistency and Stability
A Docker container isolates the application from the host machine. The container also brings everything needed to run the application – independently of the choice of the host system. This also means you can run the application on your developer machine, DEV, UAT, and Prod – even though these host systems are all different in size and performance factors.
-
Automation and Isolation
Because of the standardized structure of a container and the image it is based on, many tasks are handled the same way – whatever application you run—for example, starting and stopping, access to logs, and deployment. Because of the setup, you can also benefit from a large pool of prefabricated images that speed up your development so you can focus on your application.
-
Reduced Resources
Docker containers can run on much less hard drive space and memory than Virtual Machines (VMs) on-cloud and on-premise.
CoreMedia’s workspace also contains the necessary settings to build Docker images which can then be used to create Docker containers on your target host system. Let’s adapt the script from Building a Workspace based on GitHub Actions with the necessary changes to create the Docker images and upload these to AWS ECR as well. Other repositories are also possible, have a look at the GitHub Actions vast marketplace for the description of alternatives.
For a guide on how to set up an AWS account with an AWS ECR instance, please follow the steps described in the official AWS manual: https://docs.aws.amazon.com/AmazonECR/latest/userguide/get-set-up-for-amazon-ecr.html
Prerequisites:
-
A registered account with CoreMedia for CoreMedia’s public GitHub, Nexus, and NPM repositories. If you are not registered yet, please visit https://www.coremedia.com/support and register using the form (don’t forget to provide your business email-address and your GitHub handle). You should receive an email within the next business day or earlier.
-
The GitHub repository with the CoreMedia Workspace (Version 2506 and later) was either cloned or manually created. If you have not yet created your own GitHub repository with the CoreMedia Content Cloud Blueprint workspace, visit https://releases.coremedia.com/cmcc-12/overview/distributions and either fork the workspace from the provided GitHub link or download and manually upload the workspace into your repository.
Define the Workflow
You will create the workspace build with Docker artifacts, by adjusting the script created in Building a Workspace based on GitHub Actions. However, it is recommended, that you keep the simple workspace build to trigger automatic builds that verify code integrity (for example, after a code submission) and manually start a workflow that builds and uploads Docker images. There’s no need to create Docker images all the time whenever a developer is submitting code.
1. Creating the Workflow
-
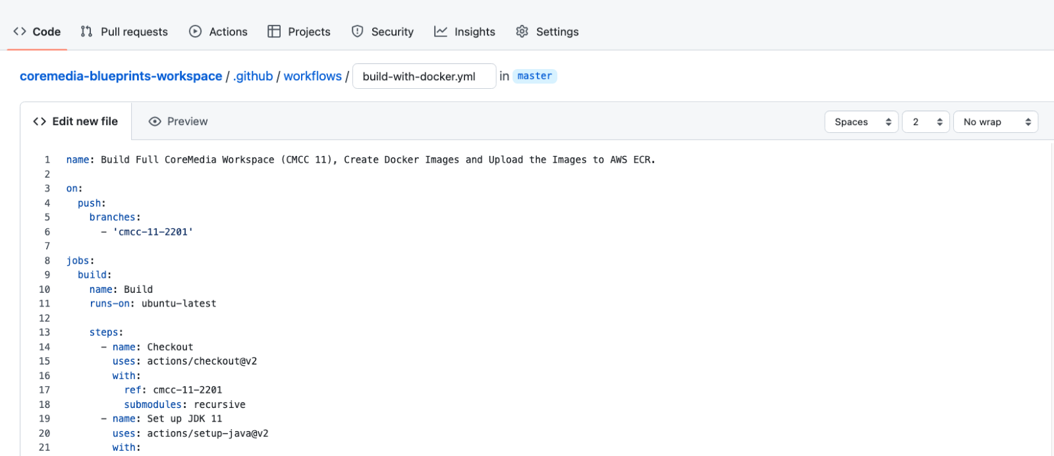
Start by creating a new "Simple Workflow" with the name "build-with-docker.yml" using the "New Workflow" button on the "Actions" Tab.
-
Copy and paste the script from Building a Workspace based on GitHub Actions into the file and adjust the name property to reflect the additional functionality.
2. Adding Steps for AWS Access
As already mentioned, you want to create the Docker images and upload them into AWS ECR. You need to adapt the two build steps at the end of the workflow, but to allow for the direct push to ECR, you need to add two actions before that. These two actions log you onto AWS and the ECR repository, which will store the Docker images. The actions are available through the GitHub Actions Marketplace and are easy to configure:
-
aws-actions/configure-aws-credentials@v1
-
aws-actions/amazon-ecr-login@v1
-
Add the Actions as shown after the step "Install the PNPM Dependencies" and before the step "Build with PNPM".
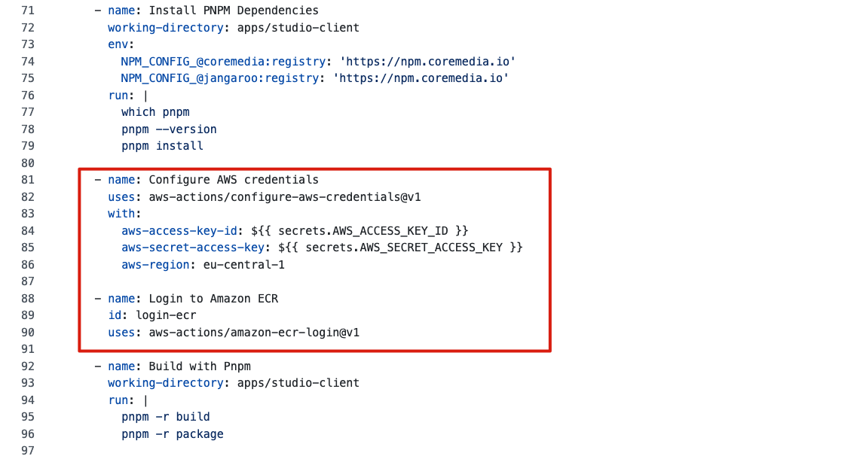
You need three properties to access AWS. Two properties are added as a secret, and one value is added directly. CoreMedia’s ECR repository is hosted in the AWS region "eu-central-1", but you can choose whatever region that fits you. You can configure this value as a secret if you like, but we kept it simple in this example.
-
Create GitHub secrets for your AWS key ID and key value. For this, switch to the Settings tab and navigate to the section "Security" > "Secret" > "Actions". Create the keys:
-
AWS_ACCESS_KEY_ID: Add the ID of your secure credentials key-value-pair to this secret.
-
AWS_SECRET_ACCESS_KEY: Add the secret of your secure credentials key-value-pair to this secret.
-
-

3. Adding Steps for Image Build and Upload
Now you need to adapt the two build steps to create Docker containers. Let’s start with the step to build Studio "Build with PNPM". Currently, the step is simply building and packaging the Studio client using PNPM. For Studio, it creates the Studio artifact, a ZIP file first, and then wraps it into a Docker image.
- name: Build with Pnpm
  working-directory: apps/studio-client
  run: |
    pnpm -r build
    pnpm -r package
You will adapt that to also build and tag the Docker container and push it into ECR.
-
First, add four environment variables:
-
ECR_REGISTRY
This is the path for the ECR repository. We make your life easy and read the registry as an output from the "login-ecr" action you added a few minutes ago.
-
ECR_REPOSITORY
The name of the repository in ECR is, in our case, "coremedia-cs", but use whatever name you picked for your repository.
-
STUDIO_CLIENT_PACKAGE_PATH
This is the relative location of the PNPM build result artifact containing the application code for the Studio Client.
-
IMAGE_TAG
You want to be able to upload various versions of your Docker Images. Hence you need to tag the images. You can use either a fixed value (for example, 'latest' or 'cmcc12') or use the Git commit sha as the image tag
(${{ github.sha }}), as it always represents the unique state of the code using the value.
-
-
After your two commands to build the Studio client ZIP file, add two links to build, tag, and push the Docker Image. We use the Docker BuildKit here, but you can omit that if you want to. The Docker BuildKit enables higher performance Docker builds and caching to decrease build times and increase productivity.
The entire build and package step for the Studio Client now look like this:
- name: Build with Pnpm and push Studio-Client image to Amazon ECR working-directory: apps/studio-client env: ECR_REGISTRY: ${{ steps.login-ecr.outputs.registry }} ECR_REPOSITORY: coremedia-cs IMAGE_TAG: cmcc-12-2506.0 STUDIO_CLIENT_PACKAGE_PATH: global/studio/build/studio-client.studio-*.zip run: | pnpm -r build pnpm -r package DOCKER_BUILDKIT=1 docker build . --tag $ECR_REGISTRY/$ECR_REPOSITORY/studio-client:$IMAGE_TAG --build-arg STUDIO_CLIENT_PACKAGE_PATH="$STUDIO_CLIENT_PACKAGE_PATH" DOCKER_BUILDKIT=1 docker push $ECR_REGISTRY/$ECR_REPOSITORY/studio-client:$IMAGE_TAG -
As the final step, you have to adapt the build step for all other CoreMedia Content Cloud components, which require Maven and not pnpm.
The adapted version of the build step looks like this:
- name: Build with Maven and push images to Amazon ECR
  env:
    NEXUS_USER: ${{ secrets.NEXUS_USER }}
    NEXUS_PASSWORD: ${{ secrets.NEXUS_PASSWORD }}
    ECR_REGISTRY: ${{ steps.login-ecr.outputs.registry }}
    ECR_REPOSITORY: coremedia-cs
    IMAGE_TAG: cmcc-12-2506.0
  run: |
    mvn clean install -DskipTests -Pdefault-image -Djib.goal=build -Djib.allowInsecureRegistries=true -Dapplication.image-prefix=$ECR_REGISTRY/$ECR_REPOSITORY -Dapplication.image-tag=$IMAGE_TAG
You are done! The full script to build the CoreMedia workspace and to build, tag, and upload the Docker images should look like this:
name: Build Full CoreMedia Workspace (CMCC 12), Create Docker Images and Upload the Images to AWS ECR.

on:
  push:
    branches:
      - 'cmcc-12-2506.0'
  jobs:
  build:
    name: Build
    runs-on: ubuntu-latest

    steps:
      - name: Checkout
        uses: actions/checkout@v2
        with:
          ref: cmcc-12-2506.0
          submodules: recursive
      - name: Set up JDK 17
        uses: actions/setup-java@v2
        with:
          java-version: '17'
          distribution: 'adopt'
          server-id: coremedia.external.releases
          server-username: NEXUS_USER
          server-password: NEXUS_PASSWORD
      - name: Cache Maven Repo
        uses: actions/cache@v2
        with:
          path: ~/.m2
          key: ${{ runner.os }}-m2-${{ hashFiles('**/pom.xml') }}
          restore-keys: ${{ runner.os }}-m2
      - name: Setup NodeJS
        uses: actions/setup-node@v2
        with:
          node-version: 18.x
      - name: Setup PNPM
        run: |
          NPM_AUTH_TOKEN=$(curl -s -H "Accept: application/json" -H "Content-Type:application/json" -X PUT --data '{"name": "${{ secrets.NPM_AUTH_USER }}", "password": "${{ secrets.NPM_AUTH_PASSWORD }}"}' https://npm.coremedia.io/-/user/org.couchdb.user:${{ secrets.NPM_AUTH_USER }} | jq -r .token)
          echo "::add-mask::$NPM_AUTH_TOKEN"
          echo "NPM_CONFIG_//npm.coremedia.io/:_authToken=$NPM_AUTH_TOKEN" >> $GITHUB_ENV
          echo "//npm.pkg.github.com/:_authToken=$NPM_AUTH_TOKEN" >> ~/.npmrc
          npm install -g pnpm@10
      - name: Install PNPM Dependencies
        working-directory: apps/studio-client
        env:
          NPM_CONFIG_@coremedia:registry: 'https://npm.coremedia.io'
          NPM_CONFIG_@jangaroo:registry: 'https://npm.coremedia.io'
        run: |
          which pnpm
          pnpm --version
          pnpm install
      - name: Configure AWS credentials
        uses: aws-actions/configure-aws-credentials@v1
        with:
          aws-access-key-id: ${{ secrets.AWS_ACCESS_KEY_ID }}
          aws-secret-access-key: ${{ secrets.AWS_SECRET_ACCESS_KEY }}
          aws-region: eu-central-1
      - name: Login to Amazon ECR
        id: login-ecr
        uses: aws-actions/amazon-ecr-login@v1
      - name: Build with Pnpm and push Studio-Client image to Amazon ECR
        working-directory: apps/studio-client
        env:
          ECR_REGISTRY: ${{ steps.login-ecr.outputs.registry }}
          ECR_REPOSITORY: coremedia-cs
          IMAGE_TAG: cmcc-12-2506.0
          STUDIO_CLIENT_PACKAGE_PATH: global/studio/build/studio-client.studio-*.zip
        run: |
          pnpm -r build
          pnpm -r package
          DOCKER_BUILDKIT=1 docker build . --tag $ECR_REGISTRY/$ECR_REPOSITORY/studio-client:$IMAGE_TAG --build-arg STUDIO_CLIENT_PACKAGE_PATH="$STUDIO_CLIENT_PACKAGE_PATH"
          DOCKER_BUILDKIT=1 docker push $ECR_REGISTRY/$ECR_REPOSITORY/studio-client:$IMAGE_TAG
      - name: Build with Maven and push images to Amazon ECR
        env:
          NEXUS_USER: ${{ secrets.NEXUS_USER }}
          NEXUS_PASSWORD: ${{ secrets.NEXUS_PASSWORD }}
          ECR_REGISTRY: ${{ steps.login-ecr.outputs.registry }}
          ECR_REPOSITORY: coremedia-cs
          IMAGE_TAG: cmcc-12-2506.0
        run: |
          mvn clean install -DskipTests -Pdefault-image -Djib.goal=build -Djib.allowInsecureRegistries=true -Dapplication.image-prefix=$ECR_REGISTRY/$ECR_REPOSITORY -Dapplication.image-tag=$IMAGE_TAG
4. Check the Result
Go ahead and save the new file. Switch to the Actions tab and follow the output if you like.
Once the workflow is finished, have a look at your ECR. You should be able to find several images, such as this:
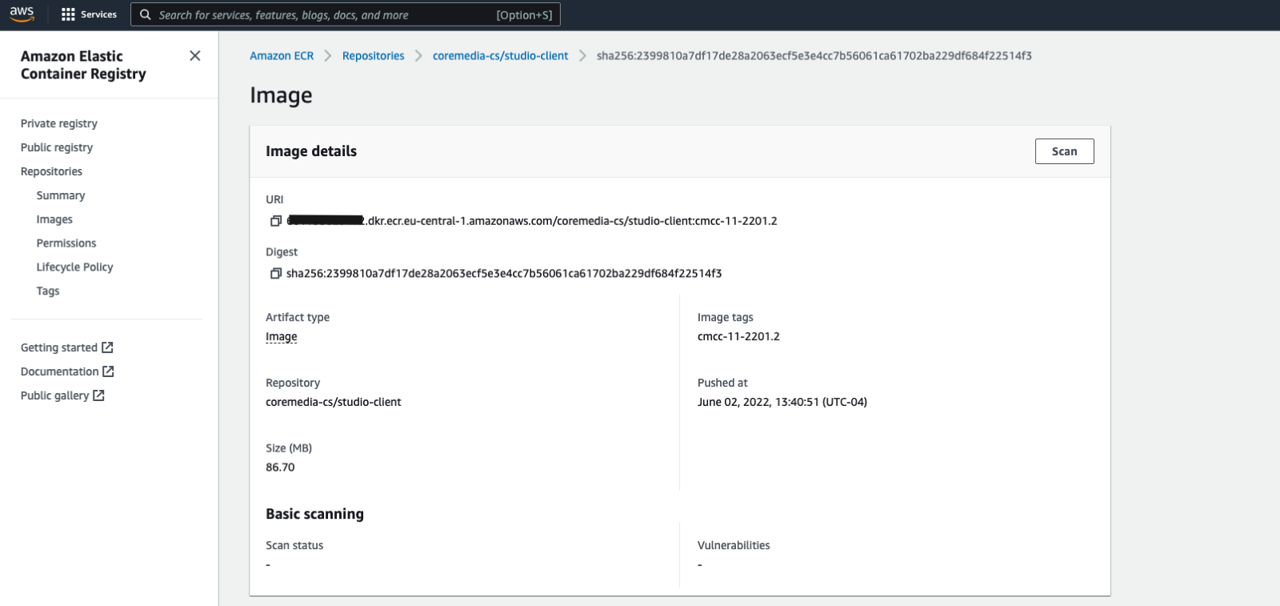
These images are now ready to use in your target environment.
Further Improvements
As mentioned, these are only the first steps. Depending on your project goals, there are many other workflows to run. For example:
-
Builds of specific branches
-
Build a single or all frontend themes
-
Upload single or multiple frontend themes to a specific CoreMedia installation
-
Deploy a single or multiple docker images to a specific server
-
Import content into a CoreMedia installation (for example, from Production to UAT)
Look at the GitHub Marketplace for inspiration and CoreMedia’s documentation for instructions on achieving these goals!
Is this page useful?