 What you will learn
- Create a workflow in GitHub
- Creating secrets
- Building the Blueprint workspace
 Prerequisites
- Development experience
- Access to CoreMedia GitHub, Nexus, and NPM repositories
 Target Audience
This guide is for Developers.
Table of Contents
Introduction
For a self-managed CoreMedia Content Cloud installation, you can set up a Continuous Integration (CI) infrastructure, for example, with the following tools:
-
Jenkins
-
Bamboo
-
TeamCity
-
CircleCI
-
GitHub Actions
These tools are server applications that provide build management and automated deployment to Development, Test, and Production servers.
Administrators or DevOps configure so-called ‘pipelines’ or ‘workflows’ to perform automated jobs that can be triggered manually or automatically.
This guide configures the commonly used workflow to build the complete workspace using GitHub Actions, but the same principles can be applied to other CI/CD tools. This way, you can validate whether the workspace builds successfully.
In the second part of this guide Building the Workspace with Docker Images in the CI you will learn how to build artifacts that can be uploaded to repositories.
Before you continue, however, we recommend reading GitHub’s documentation which explains the platform, the terminology, and the way it works very nicely: https://docs.github.com/en/actions/learn-github-actions/understanding-github-actions
Prerequisites:
-
A registered account with CoreMedia for CoreMedia’s public GitHub, Nexus, and NPM repositories. If you are not registered yet, please visit https://www.coremedia.com/support and register using the form (don’t forget to provide your business email-address and your GitHub handle). You should receive an email within the next business day or earlier.
-
The GitHub repository with the CoreMedia Workspace (Version 2512 and later) was either cloned or manually created. If you have not yet created your own GitHub repository with the CoreMedia Content Cloud Blueprint workspace, visit https://releases.coremedia.com/cmcc-13/overview/distributions and either fork the workspace from the provided GitHub link or download and manually upload the workspace into your repository.
Building the CoreMedia Workspace
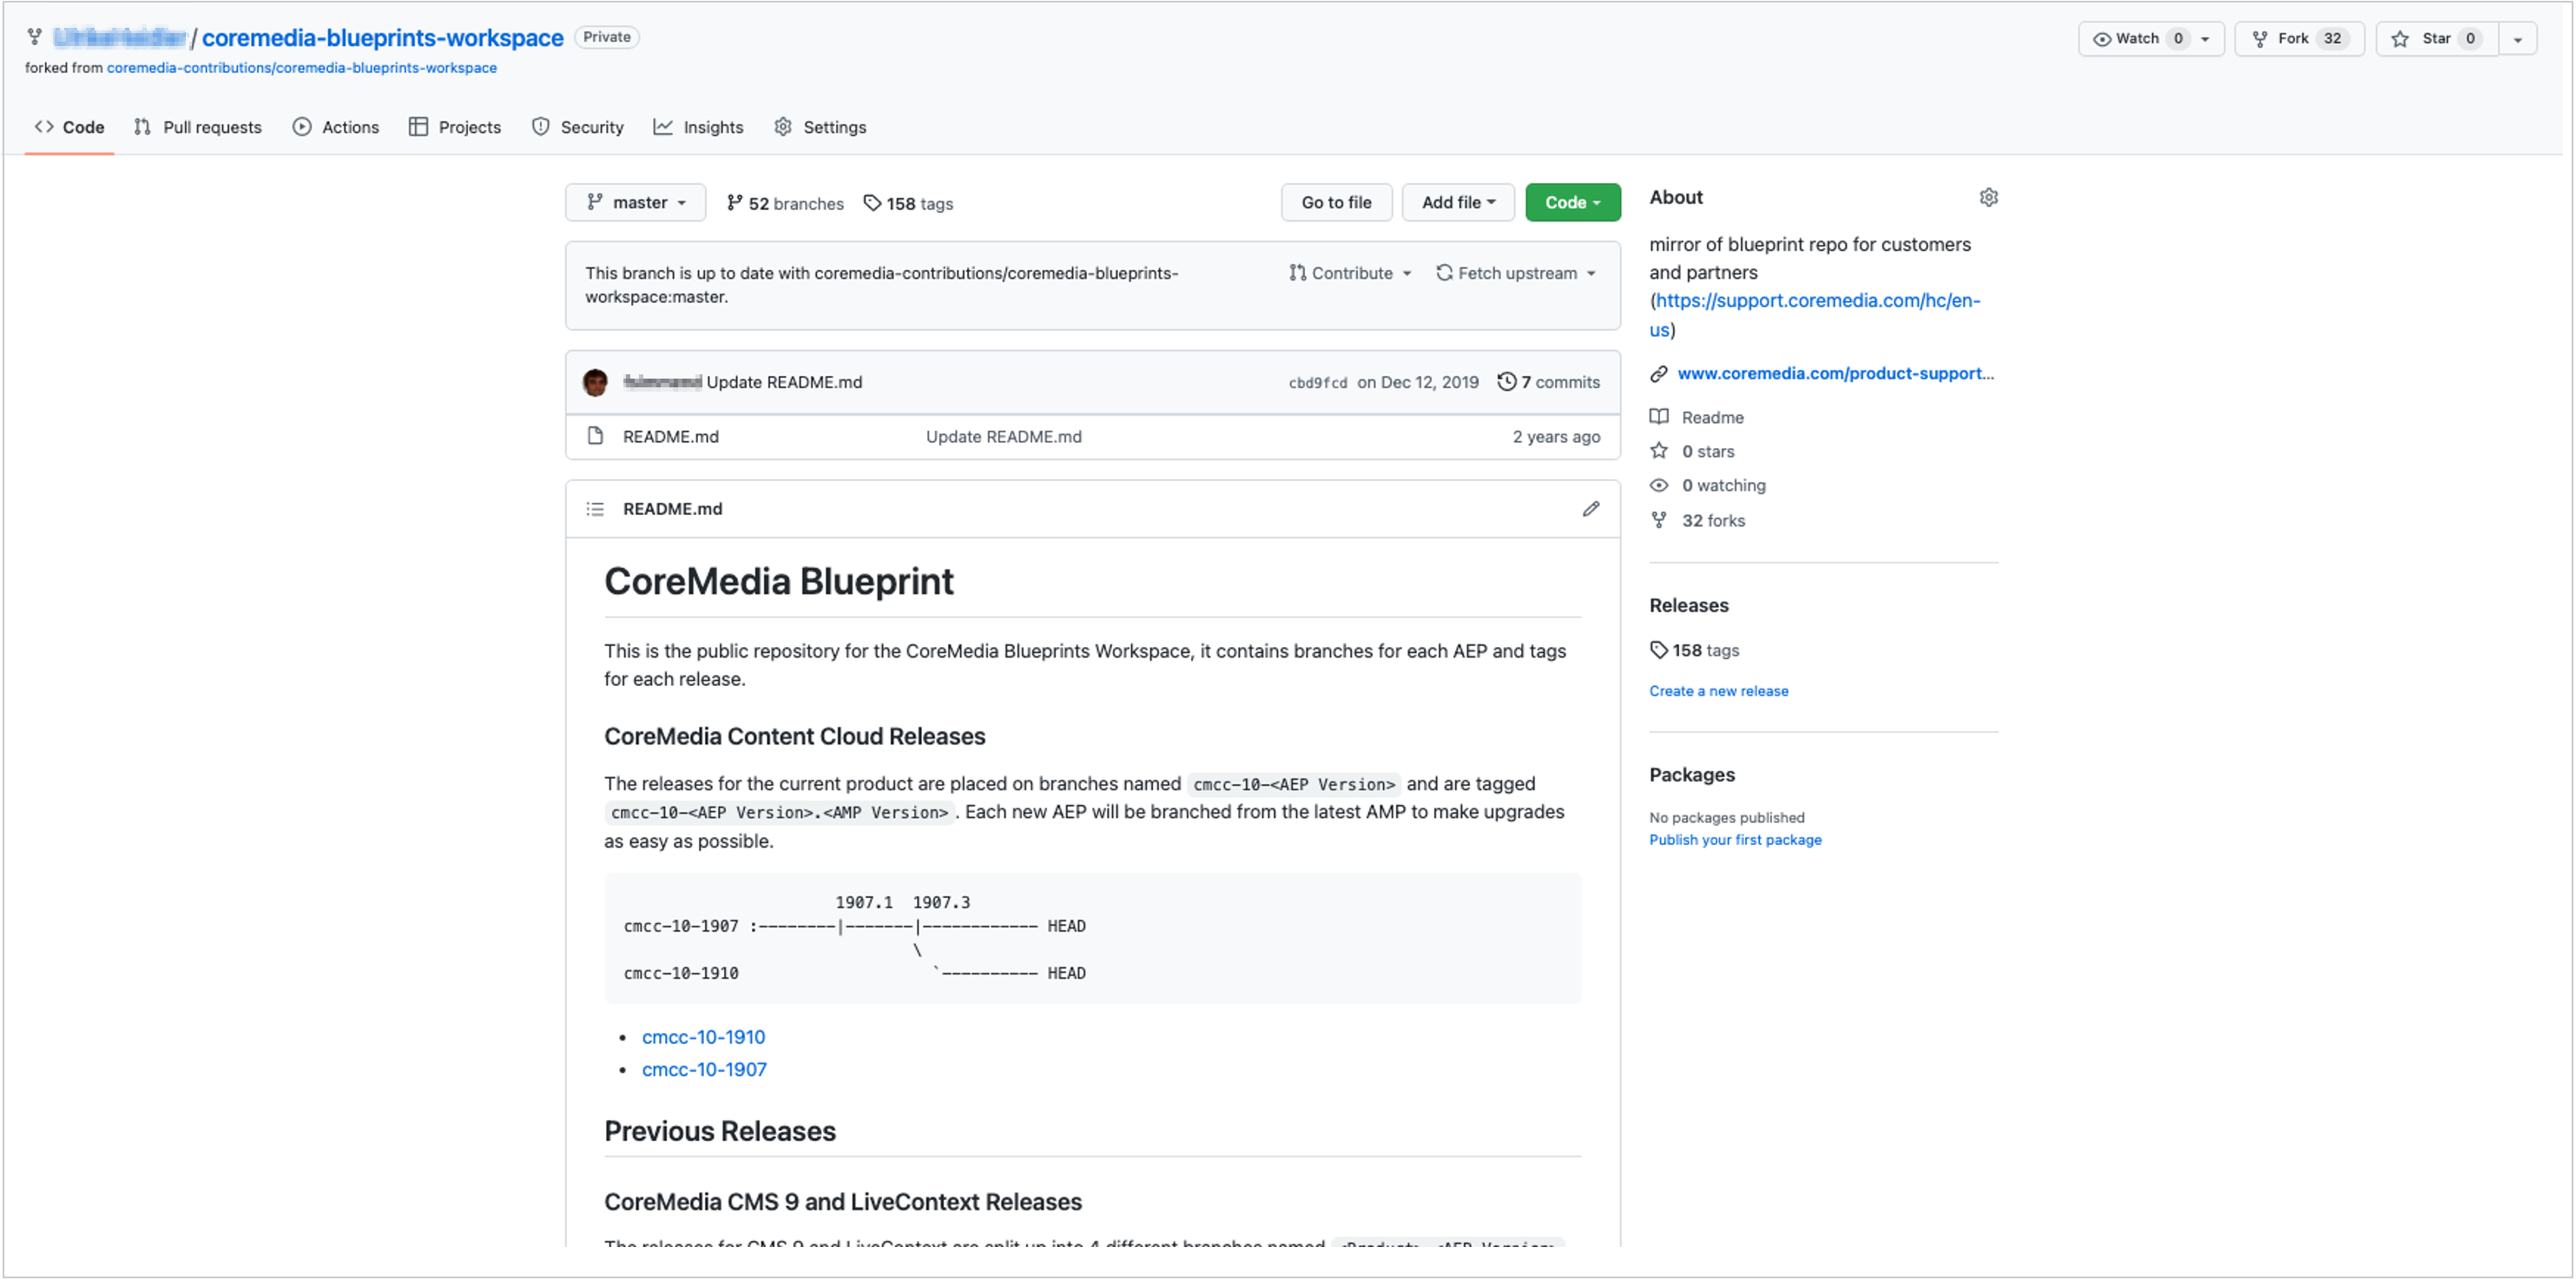
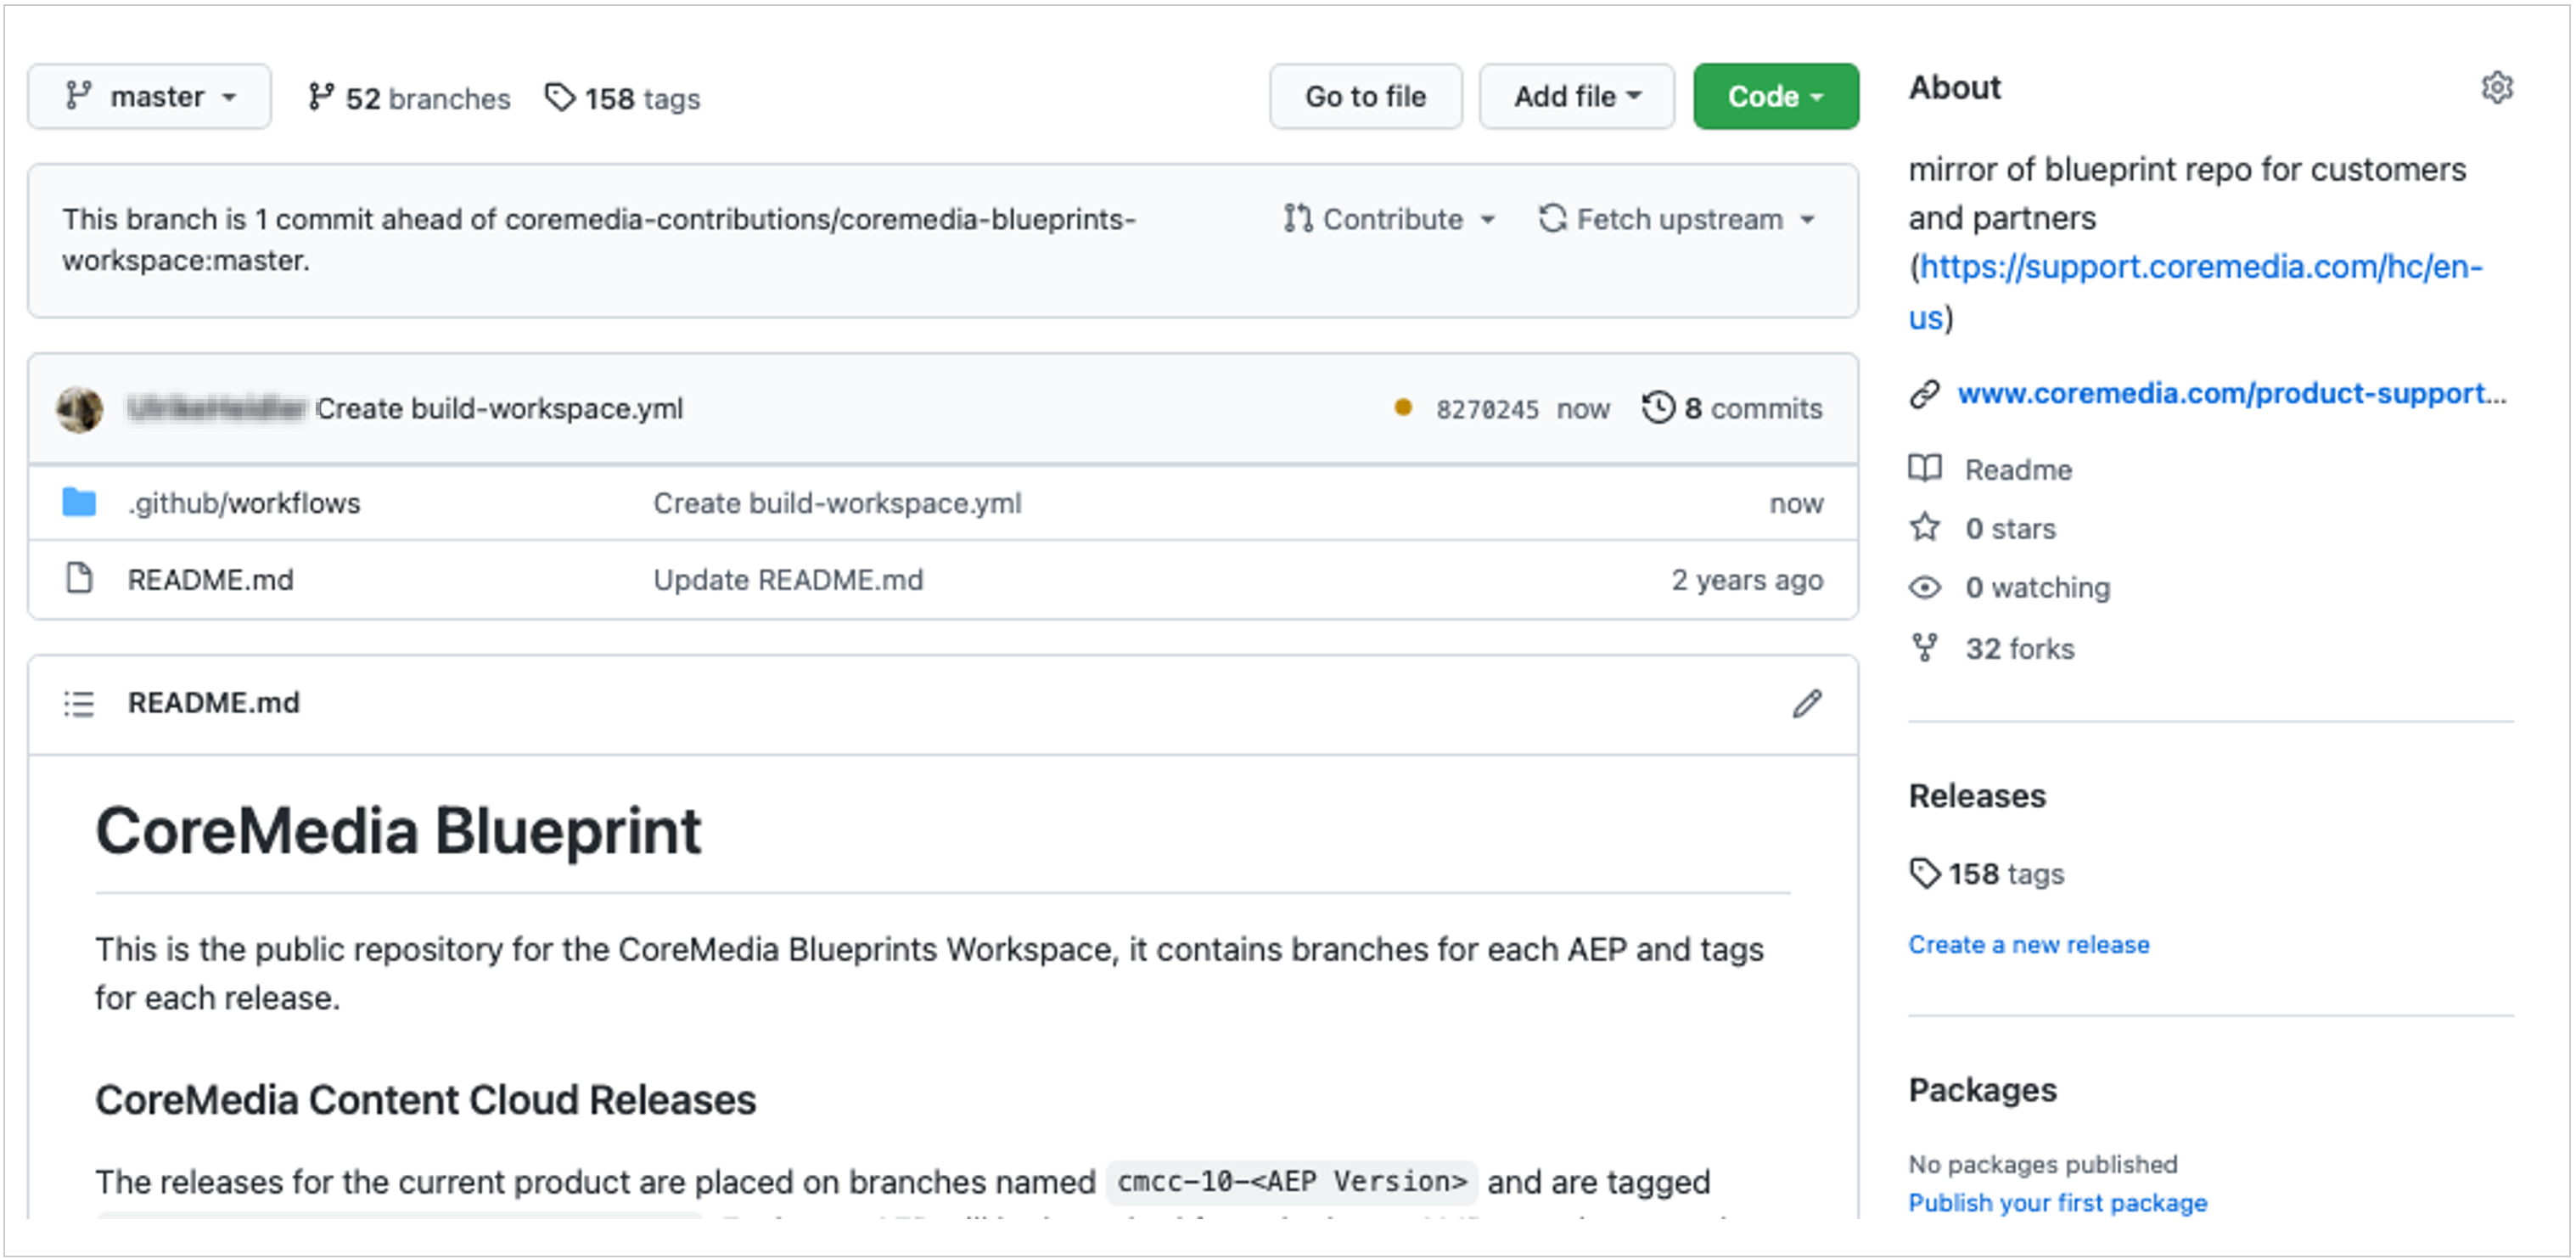
As the first step, you need to log into the GitHub account that hosts the cloned private repository. For this guide, we forked the repository directly, which means that the “master” branch is an overview branch, and the actual software is committed under the branch called 'cmcc-13-2512.0'. This structure makes it easy for this guide to focus on the GitHub Actions and not the Blueprint code. This structure is also recommended since it can make working with multiple development streams easier during upgrade efforts.
Your vanilla setup might look like this:
| Don’t worry if you submitted your code to the master branch. This will work as well, but you need to adapt the script you will create. |
Create and Configure the Workflow
-
Change to the Actions tab.
As you can see, GitHub provides a ton of prefabricated Actions. There is a vast marketplace, and many of them can be very helpful for other pipelines or Actions you have in mind. This is undoubtedly an advantage of GitHub, but you can also use the available actions as a knowledge base for pipelines with other CI/CD tools.
-
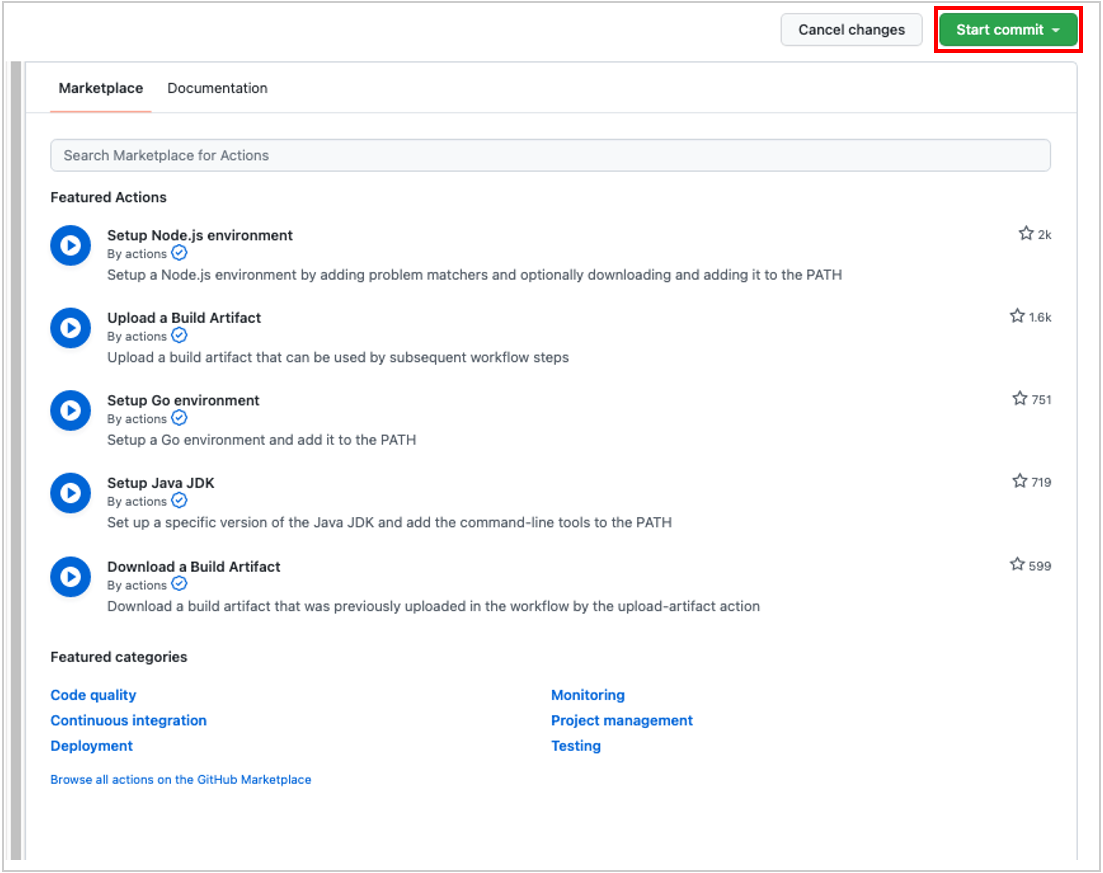
In this case, you will use a Simple Workflow (1). Click on the button Configure for this Action.
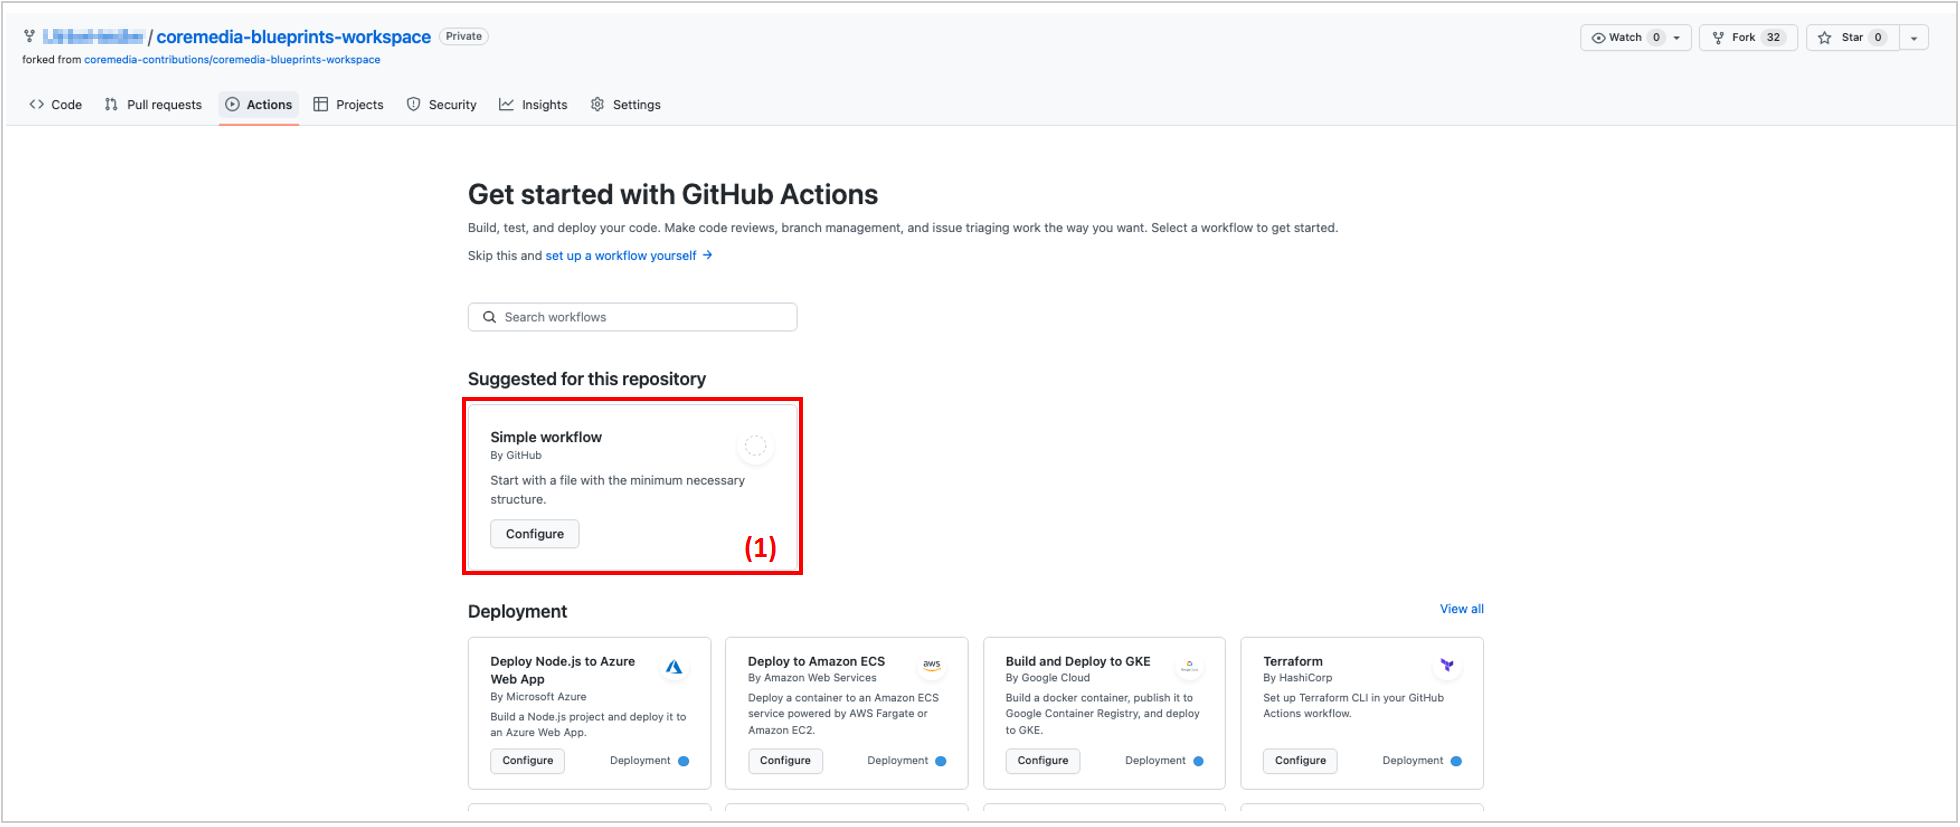 Figure 1. Configure the Action
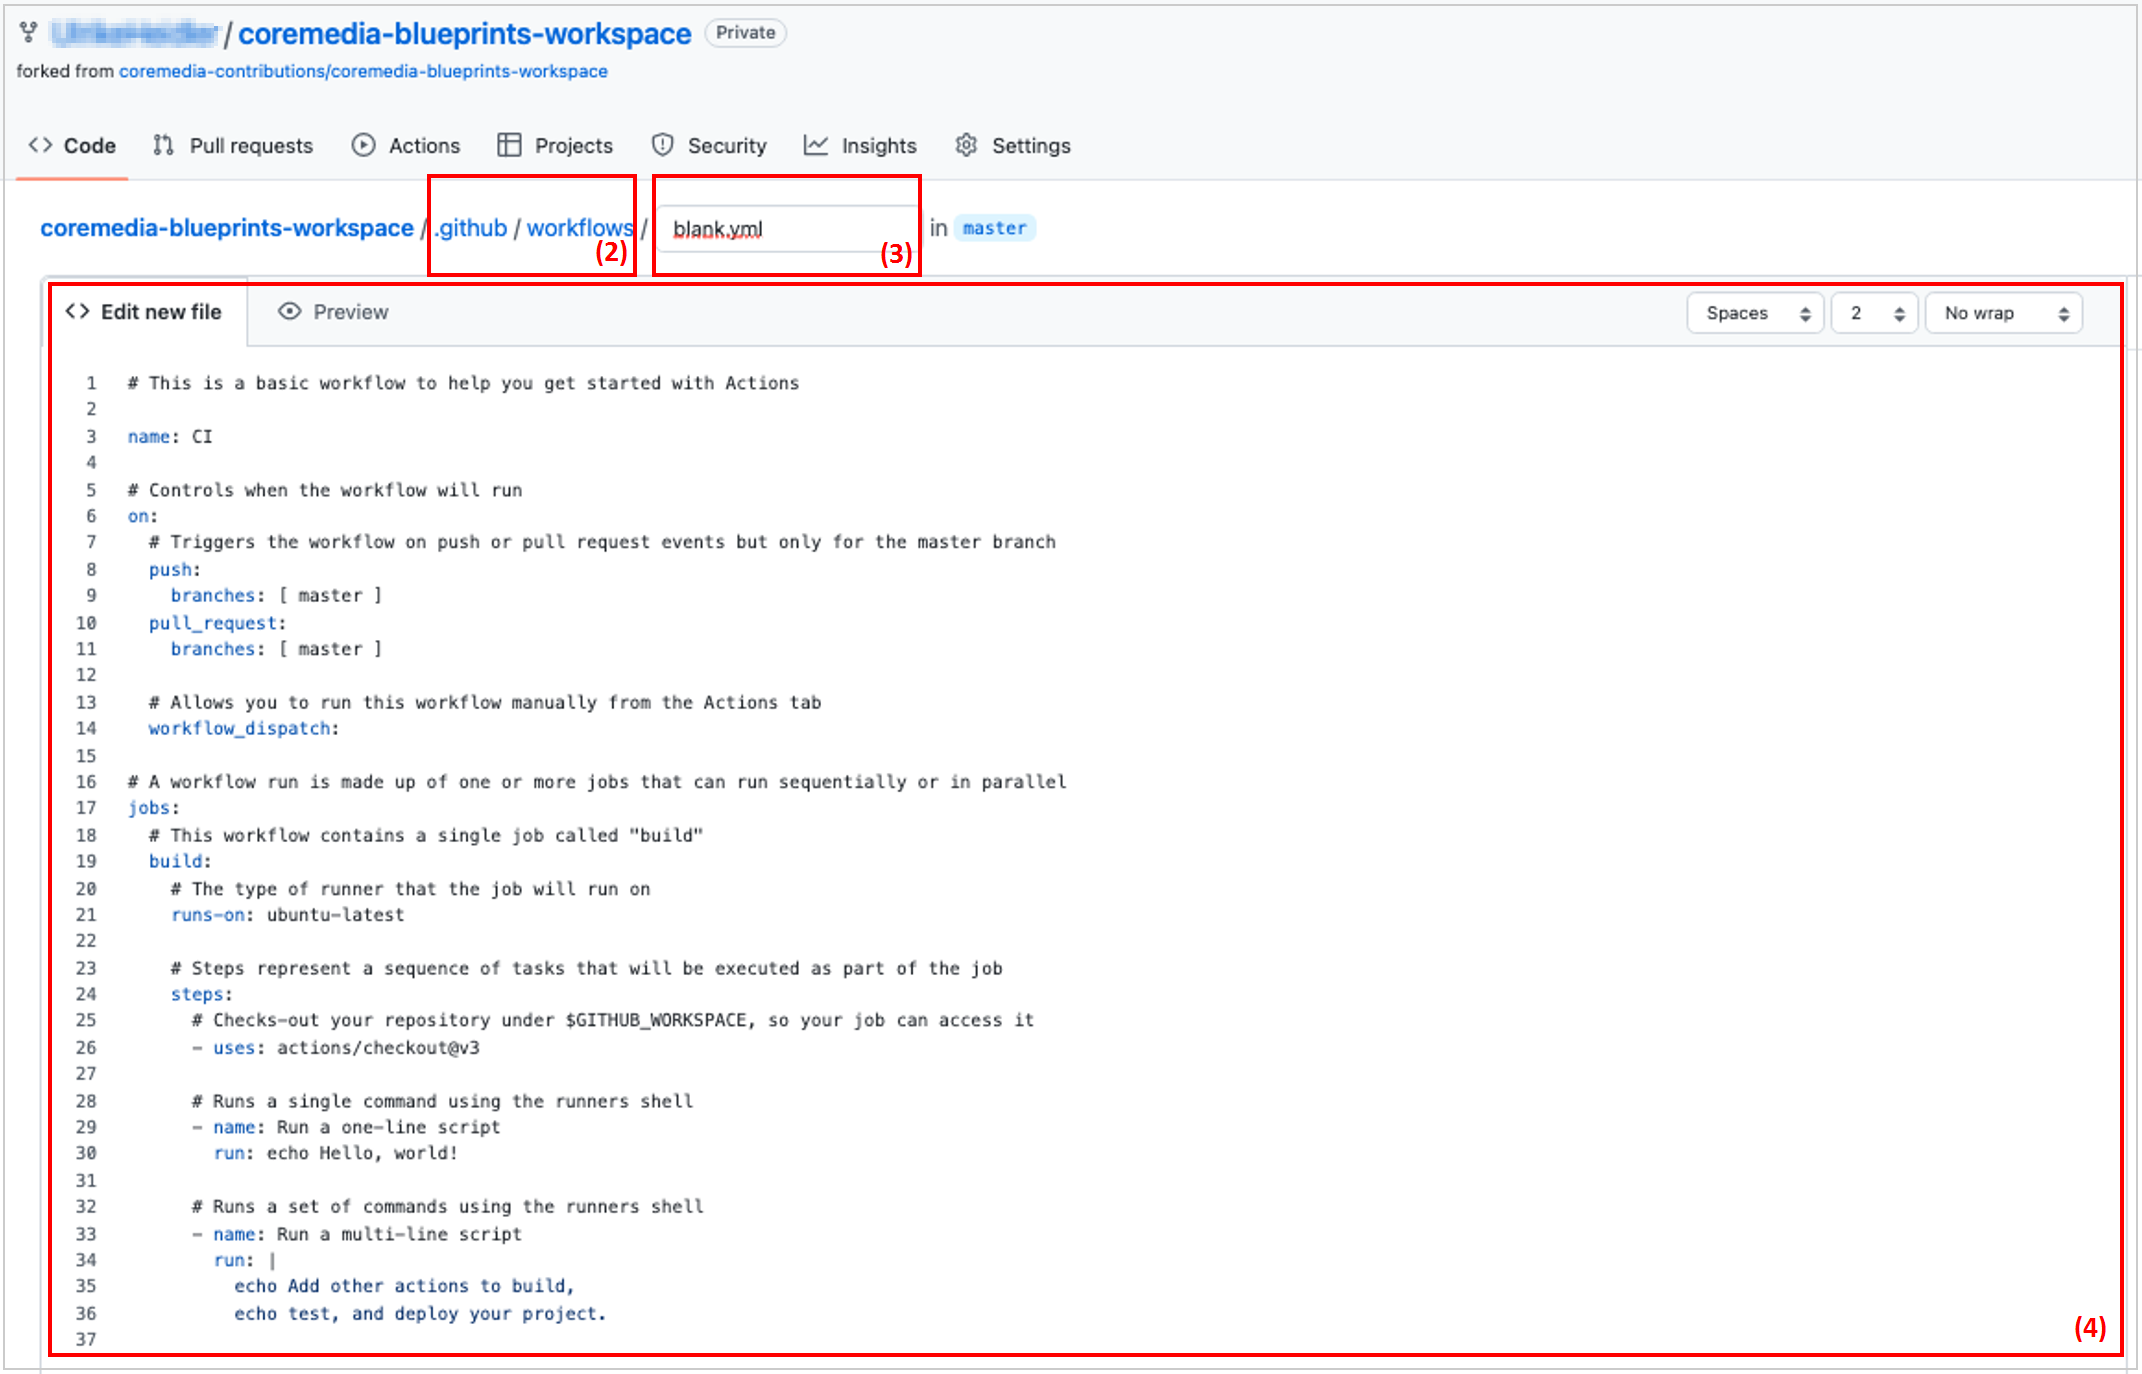
This will create a new folder in your master branch called ".github/workflows" (2) and a new YAML file "blank.yml" (3). The file contains a "Hello World" script (4) with many comments explaining the syntax.
-
Rename the script for your case to "build-workspace.yml" (5). The title is up to you, but it’s recommended to use a short, clear, and descriptive title.

-
Next, you start with the first section of the YAML file. This contains the properties "name" and "on". The name is a short description of what the action is doing, and under "on", you define how and when the Action is triggered.
-
A GitHub event triggers a GitHub workflow with GitHub Actions. There are various other options, and we recommend reading through GitHub’s documentation for GitHub events for more details and parameters: https://docs.github.com/en/actions/using-workflows/events-that-trigger-workflows. In our example case, you will trigger the build immediately after any code commit.
-
You also allow with "workflow-dispatch" that a build can be started manually via the GitHub UI.
-
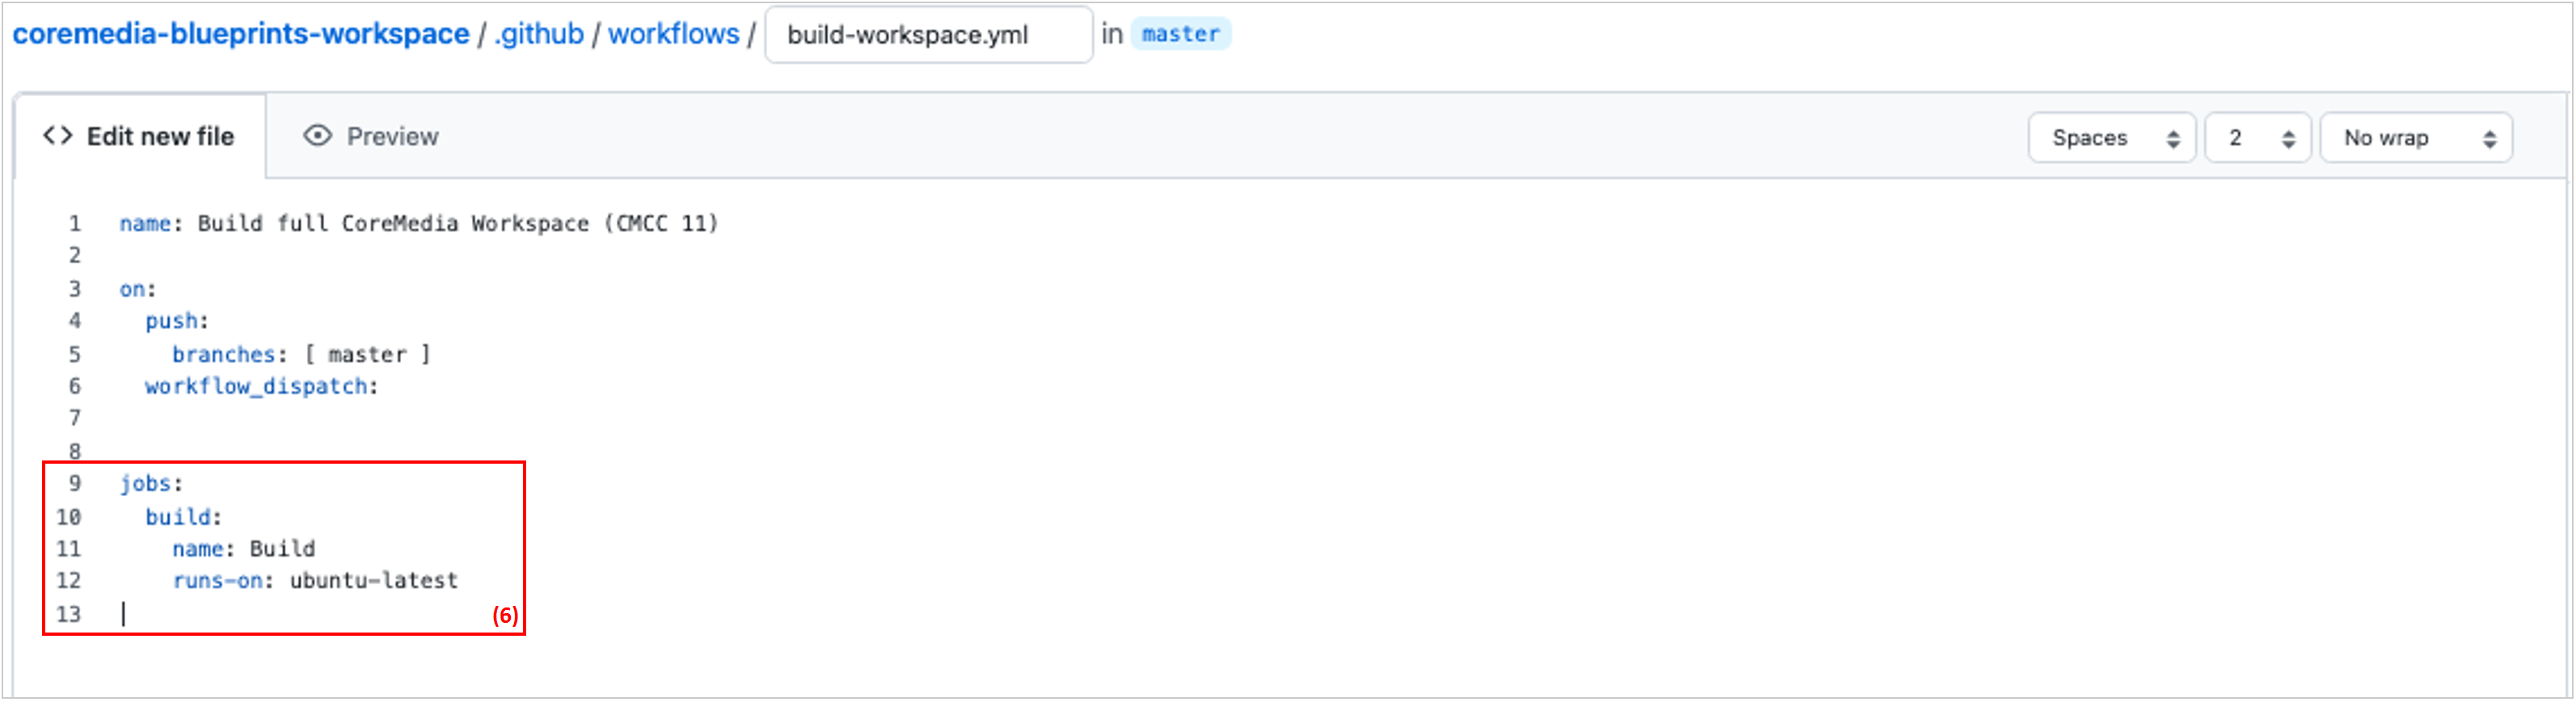
Next, continue with the "jobs"-section – basically the executed script. For your build, add one area under jobs called "build" (the name is arbitrary)
-
Add a "name", which is a short description that is certainly helpful if you run multiple jobs, and also tells the Action on which OS the action should be executed.
-
At this time, GitHub Actions supports Windows, macOS, and Ubuntu OS; you will use Ubuntu (with the latest version) (6) since that is recommended by and the most often used CI infrastructure OS for CoreMedia.


|
The tool versions used in this guide (Java, Node.js, PNPM) apply to CMCC 13. For other CoreMedia releases, please refer to the respective Supported Environment document (e.g., CMCC 13 Supported Environments.pdf) available on the CoreMedia releases page to find the correct versions. |
Defining the Build Steps
Start with a basic configuration:
-
Check out the code and set up Java. This is needed because every GitHub Action job runs on a freshly prepared virtual server – blank – with only the OS. Therefore, you need to ensure that the code is checked out on this virtual server and that the required JDK v21 is installed.
name: Build full CoreMedia Workspace (CMCC 13) on: push: branches: [ master ] workflow_dispatch: jobs: build: name: Build runs-on: ubuntu-latest steps: - name: Checkout uses: actions/checkout@v2 with: ref: cmcc-13-2512.0 submodules: recursive - name: Set up JDK 21 uses: actions/setup-java@v2 with: java-version: '21' distribution: 'adopt' server-id: coremedia.external.releases server-username: NEXUS_USER server-password: NEXUS_PASSWORD -
Notice line 18 in the script above "ref: cmcc-13-2512.0"? This is the name of the branch with the actual Blueprint code you use for this guide. Adjust this value to your branch name or use "master" if you submitted the code to the main branch.
-
You are also configuring the username and password to access Nexus. Nexus is the repository that stores the required (external as well as CoreMedia internal) artifacts for the build. Have a look at the pom.xml file on the root level of your CoreMedia Blueprint workspace. You will see the section that describes where to find this repository.
<repositories>
  <repository>
    <id>coremedia.external.releases</id>
    <name>CoreMedia CMS</name>
    <url>https://repository.coremedia.com/nexus/content/groups/cms/</url>
    <layout>default</layout>
    <snapshots>
      <enabled>false</enabled>
    </snapshots>
  </repository>
</repositories>
For this step, it is essential that you have registered an account with CoreMedia Support. You will need the account to access the repository. Please visit https://www.coremedia.com/support. -
The next step improves the performance of the Action by establishing a cache configuration for the Maven artifacts that are built.
- name: Cache Maven Repo uses: actions/cache@v2 with: path: ~/.m2 key: ${{ runner.os }}-m2-${{ hashFiles('**/pom.xml') }} restore-keys: ${{ runner.os }}-m2 -
You need to take care of two more tools for the build: Node.js, and PNPM. We recommend to start with Node. The default Action provided by GitHub is just fine, but make sure you are using NodeJS version supported by CoreMedia!
- name: Setup NodeJS uses: actions/setup-node@v2 with: node-version: 24.x -
Lastly, you need to set up and install PNPM – the package manager used. Similar to Maven artifacts, which are stored in a Nexus repository, Node artifacts are stored in an NPM Registry. You should have access to this repository with your CoreMedia account. The workflow script explicitly requests Version ^10.16.0 for PNPM; please make sure it matches the required version for CoreMedia if you run this guide with a different version. Also, did you notice the configuration of the working directory? This is needed to build the Studio Client application. If you also want to build the Frontend Themes in another action, copy the step and point the parameter for ‘working-directory’ to "frontend".
- name: Setup PNPM
  run: |
    NPM_AUTH_TOKEN=$(curl -s -H "Accept: application/json" -H "Content-Type:application/json" -X PUT --data '{"name": "${{ secrets.NPM_AUTH_USER }}", "password": "${{ secrets.NPM_AUTH_PASSWORD }}"}' https://npm.coremedia.io/-/user/org.couchdb.user:${{ secrets.NPM_AUTH_USER }} | jq -r .token)
    echo "::add-mask::$NPM_AUTH_TOKEN"
    echo "NPM_CONFIG_//npm.coremedia.io/:_authToken=$NPM_AUTH_TOKEN" >> $GITHUB_ENV
    echo "//npm.pkg.github.com/:_authToken=$NPM_AUTH_TOKEN" >> ~/.npmrc
    npm install -g pnpm@^10.16.0

- name: Install PNPM Dependencies
  working-directory: apps/studio-client
  env:
    NPM_CONFIG_@coremedia:registry: 'https://npm.coremedia.io'
    NPM_CONFIG_@jangaroo:registry: 'https://npm.coremedia.io'
  run: |
    which pnpm
    pnpm --version
    pnpm install
Building the Workspace
All prerequisite work is done now! Build the workspace.
You will do this in two steps – one build for the Studio Client and one for the Maven workspace with all other components (except the frontend themes). With all the previous configurations done, these are very quickly scripted steps.
-
Make sure to point the working directory of the build to the Studio Client directory and provide the Username and Password for the Nexus repository with the Maven artifacts.
- name: Build with Pnpm
  working-directory: apps/studio-client
  run: |
    pnpm -r build
    pnpm -r package

- name: Build with Maven
  env:
    NEXUS_USER: ${{ secrets.NEXUS_USER }}
    NEXUS_PASSWORD: ${{ secrets.NEXUS_PASSWORD }}
  run: mvn clean install -DskipTests --builder smart -T8
And that’s it. The full script should look like this:
name: Build full CoreMedia Workspace (CMCC 13) on: push: branches: [ master ] workflow_dispatch: jobs: build: name: Build runs-on: ubuntu-latest steps: - name: Checkout uses: actions/checkout@v2 with: ref: cmcc-13-2512.0 submodules: recursive - name: Set up JDK 21 uses: actions/setup-java@v2 with: java-version: '21' distribution: 'adopt' server-id: coremedia.external.releases server-username: NEXUS_USER server-password: NEXUS_PASSWORD - name: Cache Maven Repo uses: actions/cache@v2 with: path: ~/.m2 key: ${{ runner.os }}-m2-${{ hashFiles('**/pom.xml') }} restore-keys: ${{ runner.os }}-m2 - name: Setup NodeJS uses: actions/setup-node@v2 with: node-version: 24.x - name: Setup PNPM run: | NPM_AUTH_TOKEN=$(curl -s -H "Accept: application/json" -H "Content-Type:application/json" -X PUT --data '{"name": "${{ secrets.NPM_AUTH_USER }}", "password": "${{ secrets.NPM_AUTH_PASSWORD }}"}' https://npm.coremedia.io/-/user/org.couchdb.user:${{ secrets.NPM_AUTH_USER }} | jq -r .token) echo "::add-mask::$NPM_AUTH_TOKEN" echo "NPM_CONFIG_//npm.coremedia.io/:_authToken=$NPM_AUTH_TOKEN" >> $GITHUB_ENV echo "//npm.pkg.github.com/:_authToken=$NPM_AUTH_TOKEN" >> ~/.npmrc npm install -g pnpm@^10.16.0 - name: Install PNPM Dependencies working-directory: apps/studio-client env: NPM_CONFIG_@coremedia:registry: 'https://npm.coremedia.io' NPM_CONFIG_@jangaroo:registry: 'https://npm.coremedia.io' run: | which pnpm pnpm --version pnpm install - name: Build with Pnpm working-directory: apps/studio-client run: | pnpm -r build pnpm -r package - name: Build with Maven env: NEXUS_USER: ${{ secrets.NEXUS_USER }} NEXUS_PASSWORD: ${{ secrets.NEXUS_PASSWORD }} run: mvn clean install -DskipTests --builder smart -T8 -
You can now save the file with the green Start commit button on the right side.
-
Add a description or a name for the commit.
You will be redirected to the default view of the Code tab.
As you might remember from the On section, you configured that each commit will trigger the Action. Therefore, with this commit, the Action has started.
-
Switch to the Actions tab at the top.
Oops! It looks like your first build failed! Why is that? Well, you might have noticed that you used tokens at certain steps. You don’t want to hard-code usernames and passwords in the code file you just created. Hence, GitHub uses the concept of “Secrets”. You used them – for example, in the last step, where you added two environment variables:
NEXUS_USER: ${{ secrets.NEXUS_USER }} NEXUS_PASSWORD: ${{ secrets.NEXUS_PASSWORD }} -
The values of these two properties use the GitHub secret notification, and you need to upload the actual value for these parameters. For this, switch to the Settings tab and navigate to the section Security > Secret > Actions.
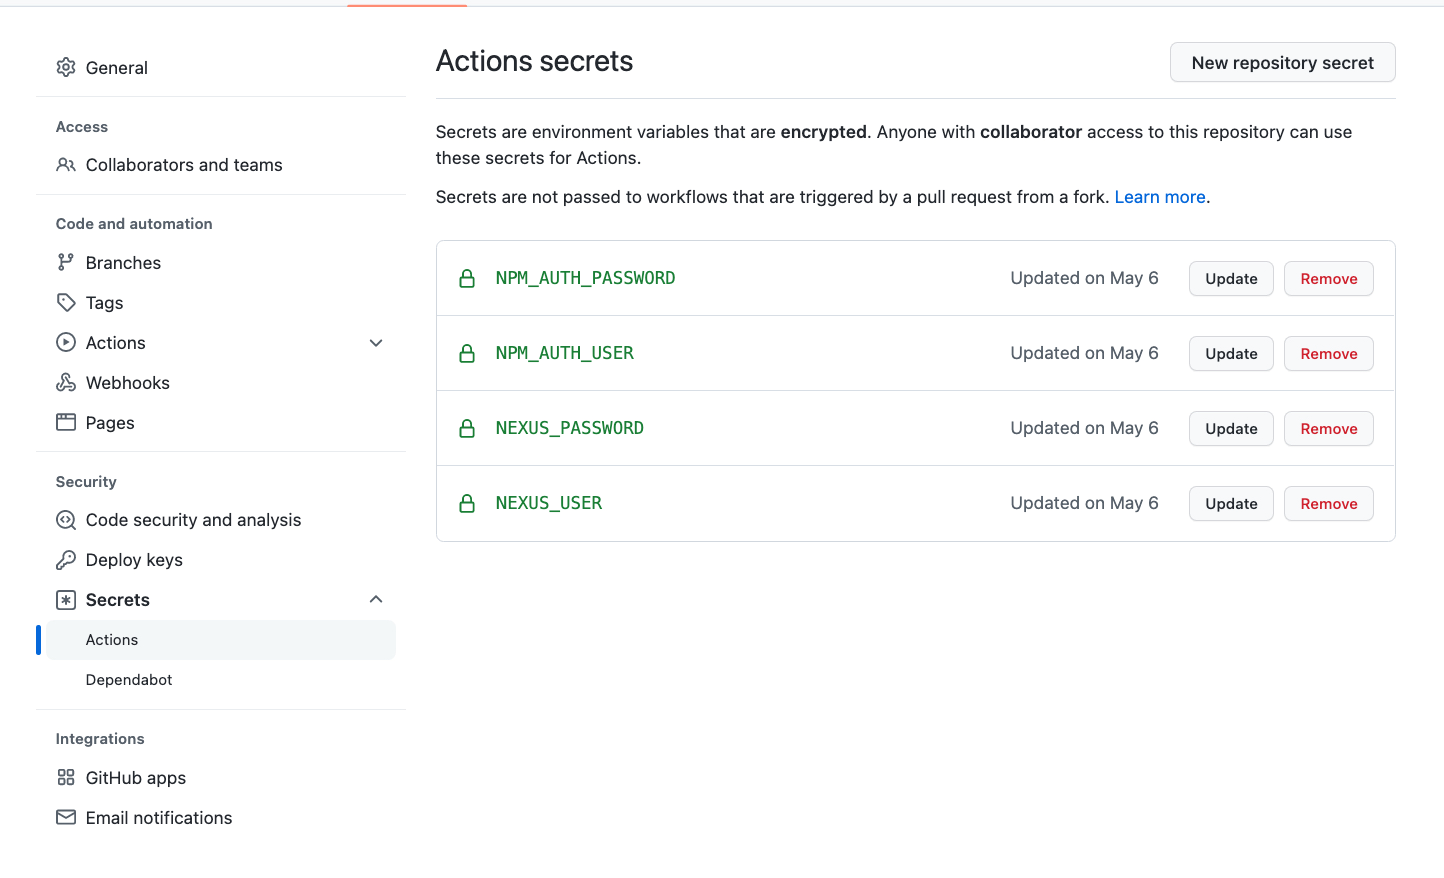
You need four secrets:
-
NPM_AUTH_USER: The username to access the NPM repository
-
NPM_AUTH_PASSWORD: The password to access the NPM repository
-
NEXUS_USER: The username to access the Nexus repository
-
NEXUS_PASSWORD: The password to access the Nexus repository
Unless you have different configurations (for example, you are using your Nexus or your NPM registry, which is the recommended approach), you should be able to use your username and password for your CoreMedia account for the Nexus pair.
-
-
To be able to download the packages from https://npm.coremedia.io, you need a GitHub access token which can be created via github.com (https://docs.github.com/en/authentication/keeping-your-account-and-data-secure/creating-a-personal-access-token). The token will require the following rights:
-
read:org
-
read:user
-
read:packages
-
-
After creating the access token, you can use the npm client to log in to https://npm.coremedia.io, providing your GitHub username (when asked for a username) and the generated access token (when asked for a password):
pnpm login --registry=https://npm.coremedia.io -
Add the four variables to your GitHub Secret list. Click on the button New repository secret in the upper right corner to create a new secret. Use the same parameter key you used in the script for the secret’s Name and your username as the Value. Click on the button Add secret.
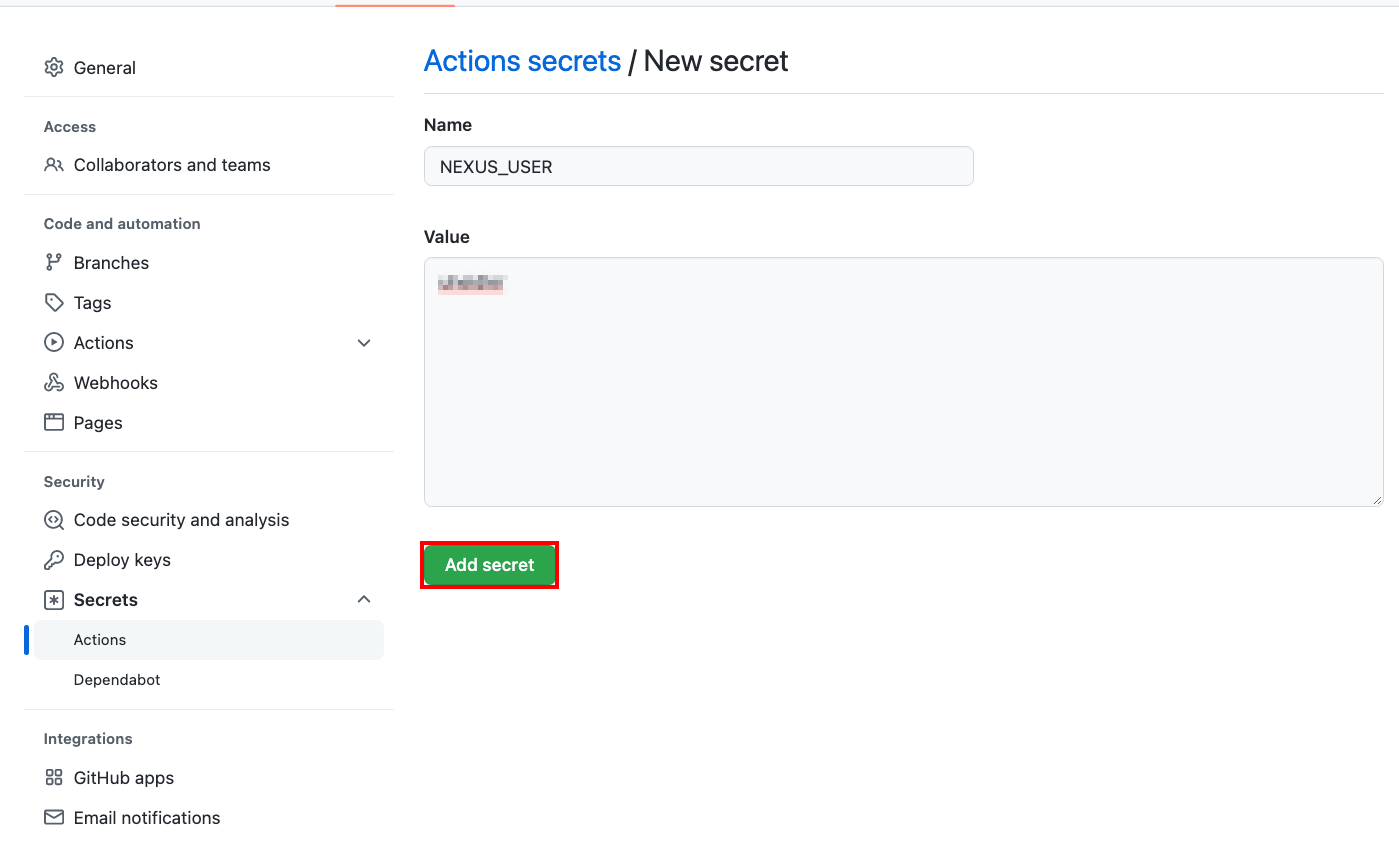
Use the GitHub Access Token as well for the NPM_AUTH_PASSWORD value! -
You should have a list of these four entries:
-
Now switch back to the tab Actions, select your workflow, and click on Run workflow with this in place.

-
After a few moments, your second attempt should appear as an additional line in the history on top.
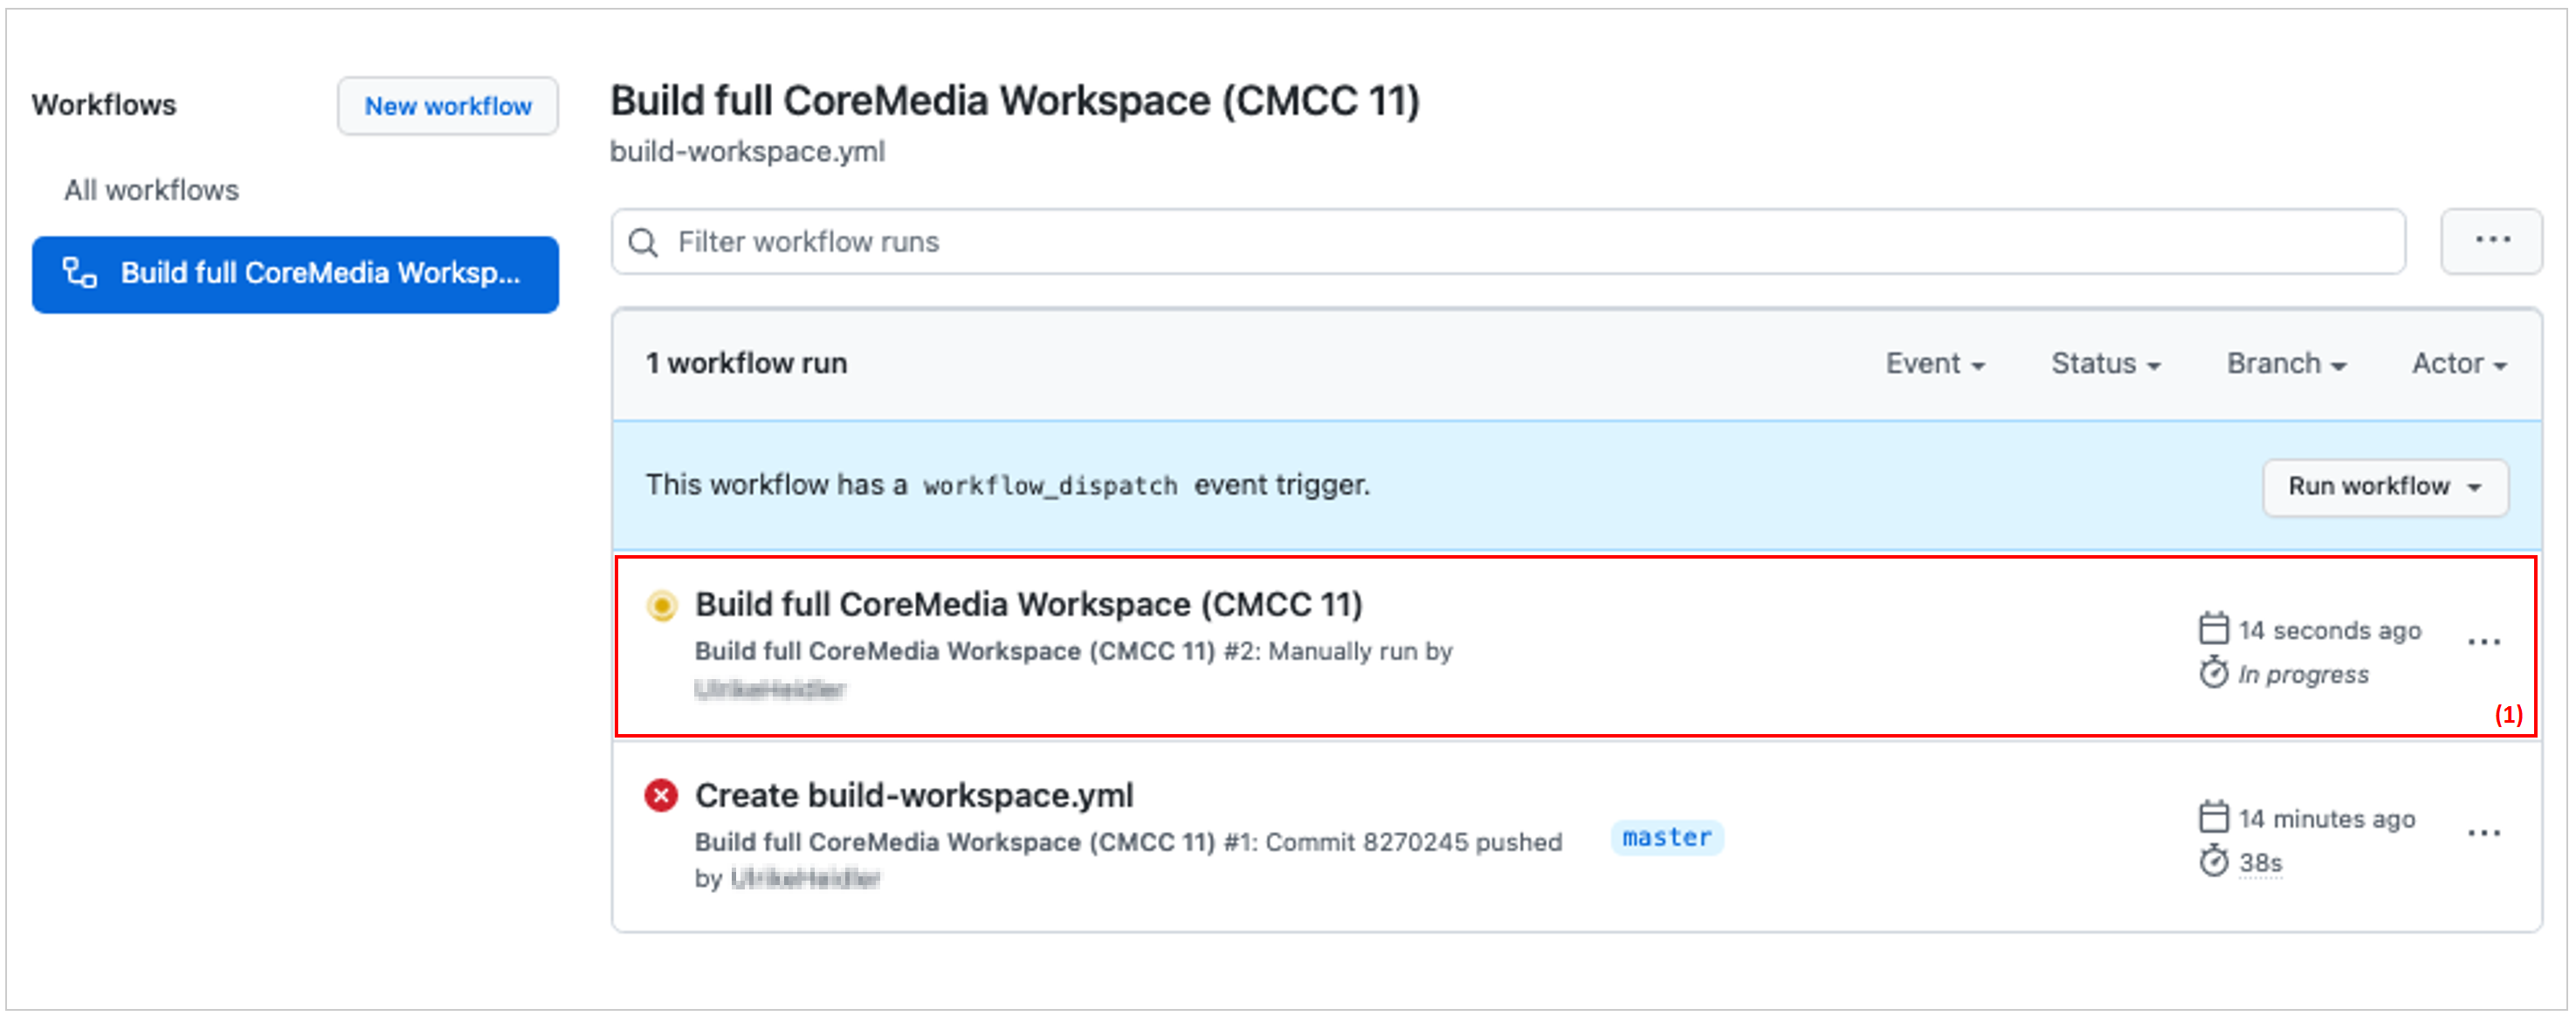
Click on this entry (1) to get to the detail view.
-
Then, click on the job called Build to follow the console log.

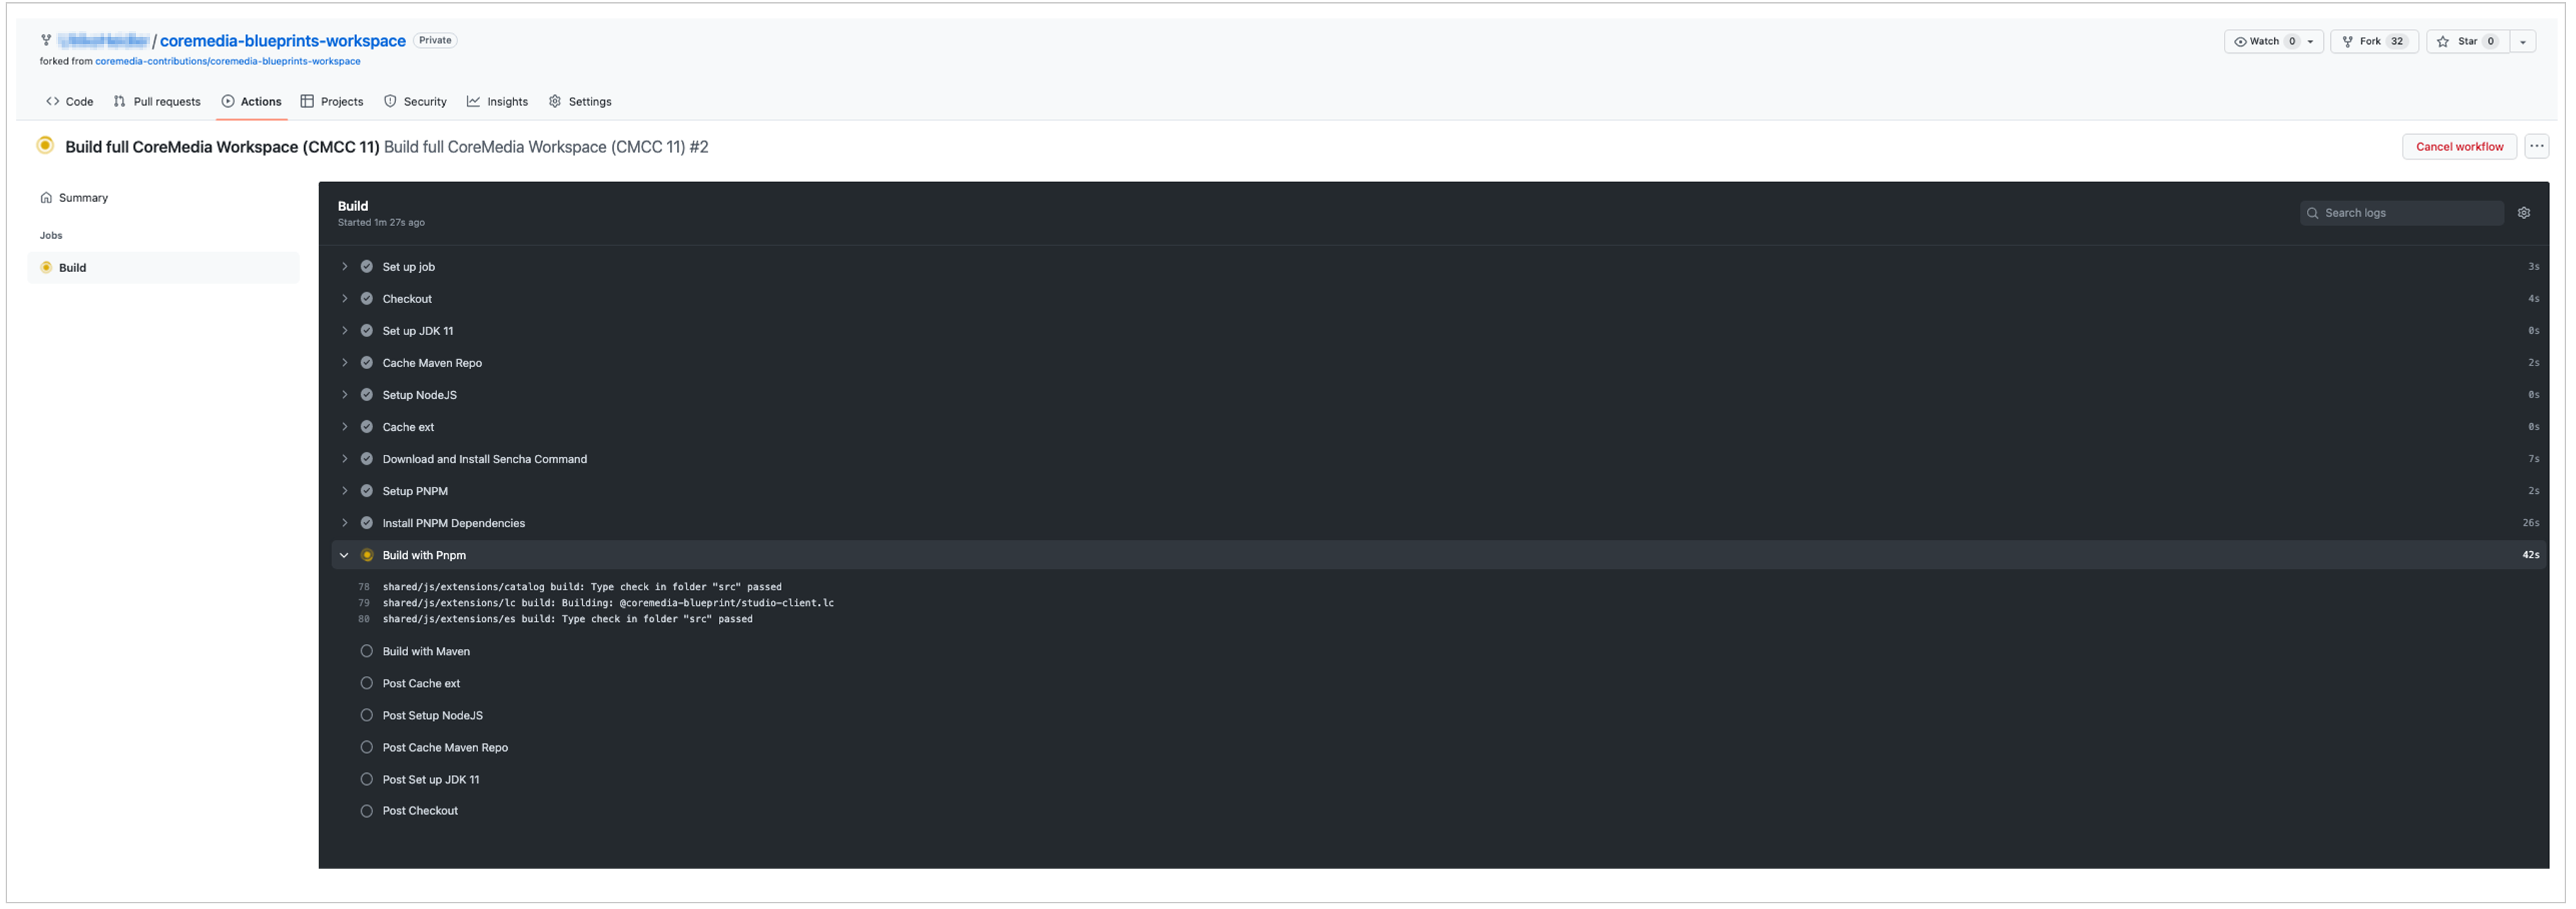
If you run this for the first time, completing the entire build will take several minutes. There are quite a few resources that need to be downloaded – so go and grab a coffee when you see that the two build steps (for PNPM and Maven) are reached.
Notice how a few additional steps start with Post? These are cleanup steps that GitHub Actions is automatically adding for you. Very convenient!
-
The green checkmark icon on the left indicates that the build was successful! Perfect!
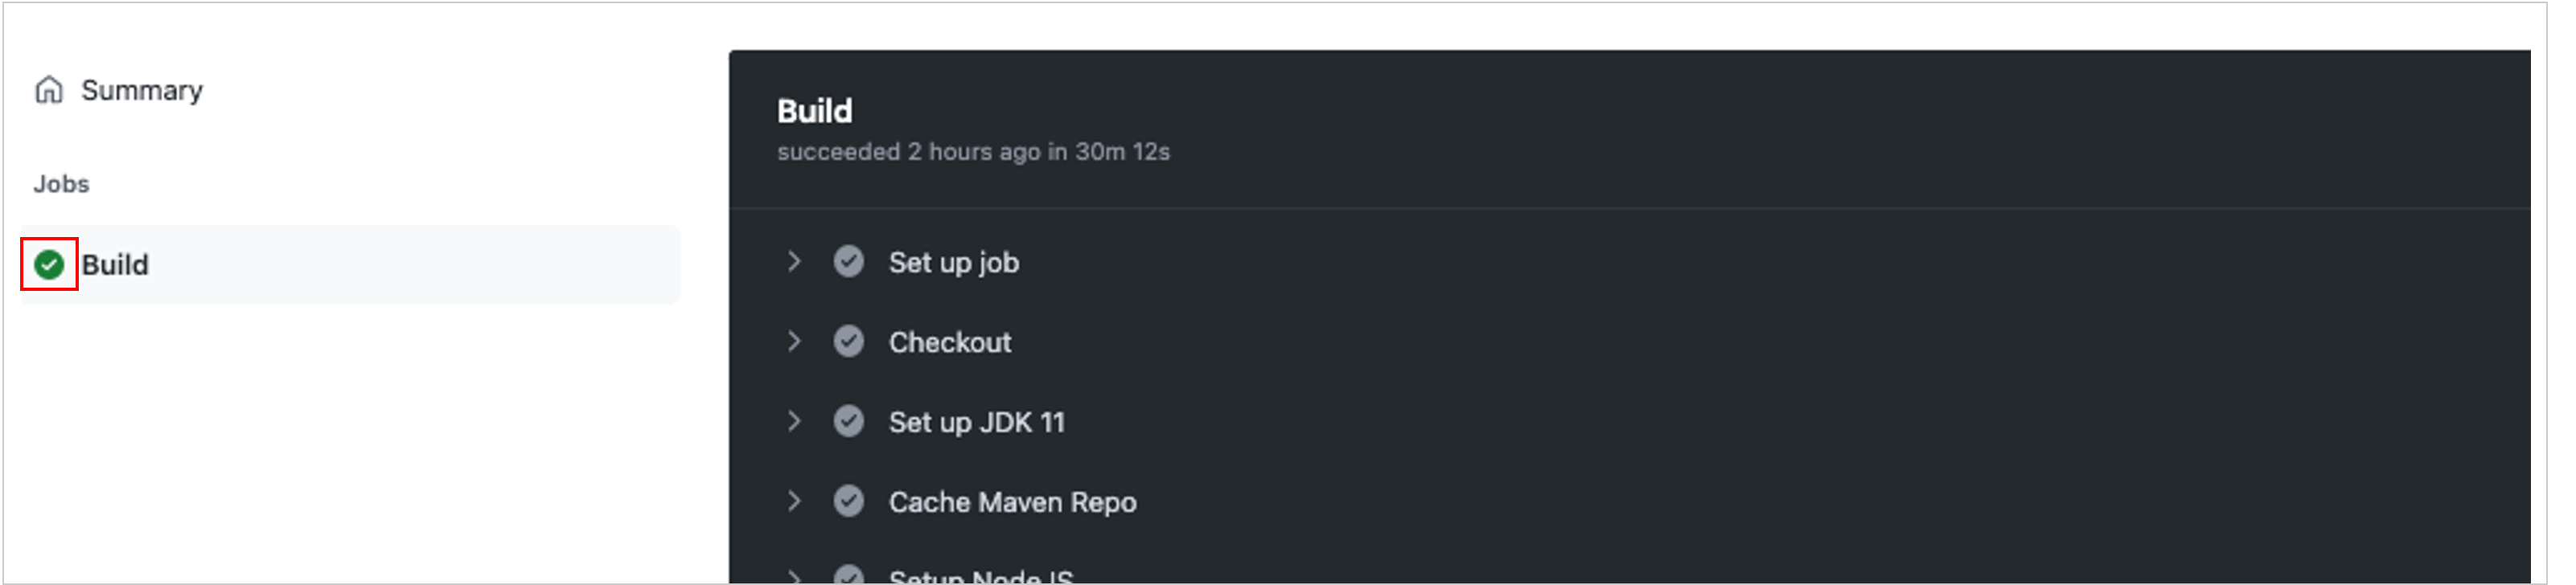
Congratulations on your first GitHub Actions workflow for building the CoreMedia Blueprint Workspace.


You might want to continue with the second part of this guide Building the Workspace with Docker Images in the CI were you will learn how to build artifacts that can be uploaded to repositories.
Is this page useful?