


Search Manual / Version 2310
Table Of ContentsThe most simple approach for Content Feeder and CAE Feeder indices is to clear the existing index and restart the Feeder. The Feeder will then reindex everything from scratch. In most cases this is not what you want, because search will be unavailable (or only return partial results) until reindexing has completed. See Section 4.6.4, “Clear Search Engine index” and Section 5.3.2, “Resetting” for instructions how to clear an existing index for Content Feeder and CAE Feeder, respectively.
A better solution is to feed a new index from scratch but keep using the old one for search until the new index is up to date. Applications can use the new index when reindexing is complete. When everything is fine, the old index can be deleted afterwards. This approach does not only have the advantage of avoiding search downtime but makes it also possible to test changes before enabling the index for all search applications.
Reindexing in Existing Solr
This approach is appropriate if the current Solr version is to be kept and just data needs to be reindexed.
To prepare a new index, you need to set up an additional Feeder and configure it to feed the new index. The new Feeder instance will eventually replace the existing Feeder instance.
The following steps describe the procedure for a standalone Solr server with optional leader/follower replication. For a SolrCloud cluster, different steps have to be taken. See Solr Reference Guide: Reindexing - Index to Another Collection for reindexing into another SolrCloud collection.
Add a new Solr core for the new index. The Solr Admin UI supports adding Solr cores in general but currently still lacks support for named config sets (SOLR-6728), so you have to create the new core with a HTTP request. To this end, you just need to send a request to the following URL with correct parameters, for example by opening it in your browser.
http://<hostname>:<port>/solr/admin/cores?action=CREATE&name=<name>&configSet=<configSet>&dataDir=dataReplace
<hostname>and<port>with host name and port of the Apache Solr leader.Replace
<name>with the name of the new core. You can choose any name you like as long as no such core and no such directory below the configuredcoreRootDirectoryexists yet. If you are using Elastic Social you should also avoid names that start with the configuredelastic.solr.index-prefixfollowed by an underscore (for example,blueprint_) to avoid name collisions with automatically created Solr cores.Replace
<configSet>with the name of the config set of the new core. This should be "content" for Content Feeder indices and "cae" for CAE Feeder indices. Alternatively you can set it to the name of a custom config set, if you are using differently named config sets in your project.
Check that the new core was successfully created in the
coreRootDirectory. There should be a new subdirectory with the name of the newly created core which contains acore.propertiesfile. For example, if a corestudio2with config setcontentwas created, then<coreRootDirectory>/studio2/core.propertiesshould contain something like:#Written by CorePropertiesLocator #Mon Feb 27 14:45:44 UTC 2017 name=studio2 dataDir=data configSet=content
You can also open the Solr Admin UI at
http://<hostname>:<port>/solr, which shows the newly created core on the page:Set up a new Feeder instance and configure it to feed into the new Solr core. In the Content Feeder, the name of the new core must be configured with property
solr.content.collection. In the CAE Feeder, the name of the new core must be configured with propertysolr.cae.collection.For example, to configure a newly set up Content Feeder to feed into the new core with name
studio2, set inapplication.properties:solr.content.collection=studio2
In case of a CAE Feeder, you must also configure it with a separate empty database schema.
Start the new Feeder and wait until the new index is up-to-date, for example by checking the log files or searching for a recent change in the new index. Depending on the size of the content repository this may take some time.
Stop the Feeders for both the old and new Solr core.
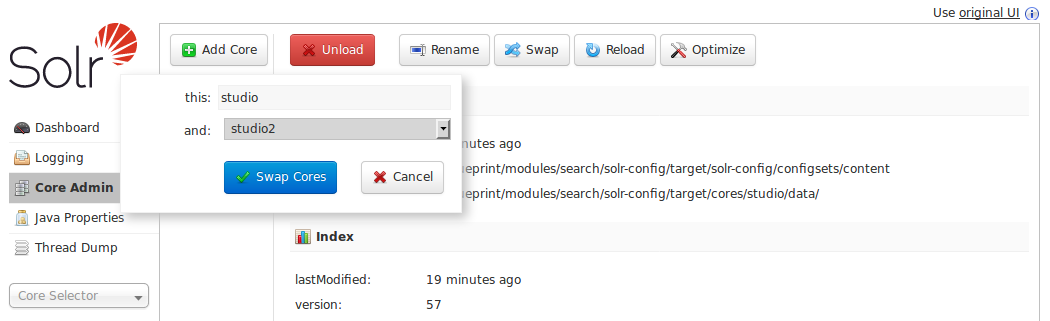
To activate the new index, it's now time to swap the cores so that the new core replaces the existing one. You can swap cores with the [Swap] button on the page of the Solr Admin UI. Afterwards, all search applications automatically use the new core, which is now available under the original core name.
It's important to understand that this operation does not change the directory structure in
<coreRootDirectory>but just thenameproperty in the respectivecore.propertiesfiles. For the example of swapping coresstudioandstudio2, you now have a newly indexed Solr core namedstudioin directory<coreRootDirectory>/studio2. You can verify this by looking into itscore.propertiesfile:#Written by CorePropertiesLocator #Mon Feb 27 15:06:27 UTC 2017 name=studio dataDir=data configSet=content
Reconfigure the new Feeder instance to use the new core under the original name. To this end, the value of property
solr.content.collectionfor the Content Feeder or propertysolr.cae.collectionfor the CAE Feeder needs to be changed accordingly. Start the new Feeder instance.For example, to configure the Content Feeder to feed into the new core which is now available under name
studio, set inapplication.properties:solr.content.collection=studio
If you're using Solr replication, the new index will be replicated automatically to the Solr followers after a commit was made on the Solr leader for the new core. The restart of the Feeder in the previous step caused a Solr commit so that replication should have started automatically. If not, a Solr commit can also be triggered with a request to the following URL, for example in your browser with
http://localhost:40080/solr/studio/update?commit=truefor the Solr core namedstudioon the Solr leader running on localhost and port 40080.Note that depending on the index size, replication of the new core may take some seconds up to a few minutes during which the old index is still used when searching from Solr followers. You can see the progress of replication on the Solr follower's Admin UI on page after selecting the corresponding core.
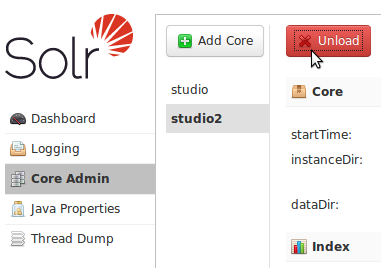
To clean things up, you can now unload the old Solr core from the Solr leader with the [Unload] button on the page of the Solr Admin UI. In the example, this would be the core named
studio2.If you like, you can now also delete the old Feeder installation and the directory of the old Solr core with its index. In this example that would be
<coreRootDirectory>/studio


Note
You can use HTTP requests to perform the [Swap] and [Unload] actions instead of using the Solr Admin UI as described above. For details, see Solr Reference Guide: CoreAdmin API.
Reindexing in New Solr
This approach is appropriate, if the Solr version is to be updated (e.g., in the course of an AEP update) and data needs to be reindexed in a dedicated instance of this new Solr version.
To prepare the new Solr index, you need to set up additional Feeders and an instance of the new Solr version. The additional Feeders must be configured to feed the new index. The new Feeder instances and Solr will eventually replace the existing Feeder instances and Solr.
The following steps outline the procedure.
Provide instances of updated Feeders and Solr from the CoreMedia release with the updated Solr version. Do this on dedicated new hosts to avoid port clashes with existing Feeders and Solr. Also provide dedicated database schemas for new Feeders and space for new Solr indexes. Configure Feeders to attach to Content Servers of the existing installation while sending index data to the new Solr.
There should now be a logical setup as in the following diagram (excerpt from full CMS). Light-gray boxes represent components from the existing CMS, light-green boxes represent components with updated versions.
Note
Although mixed operation of Feeders and Content Servers in different versions is generally not supported, the Feeders will typically connect successfully to Content Servers from several releases back. Actual success of mixed operation needs to be tested for any concrete setup.
Start new Feeders and check that data is indexed in new Solr. For that purpose, go to the new Solr's Admin UI and wait until all cores have caught up with the cores of the old Solr installation in terms of number of indexed documents. A small difference may be neglected as the new Feeders will continue to catch up when the CMS is fully updated.
When the new Solr has indexed all (or the majority of) documents, proceed with updating the CMS as usual. You may leave the running new Solr installation untouched. Feeders should be shut down temporarily, though, to avoid unnecessary errors in logs.
Reconfigure Solr clients to attach to the new Solr installation.
Do not restart old Feeder and Solr installations with the updated CMS. They may be removed at a later point.
There should now be a logical setup as in the following diagram (excerpt from full CMS). Light-gray boxes represent components from the old CMS (now shut down), light-green boxes represent components with updated versions.
After successful update, the old Feeders and Solr, together with their databases and indexes, may be deleted.


