[
  "https://github.com/coremedia-contributions/perso-plugin/releases/download/v2.0.1/perso-plugin-2.0.1.json"
]Installing the Native Personalization Plugin
Last updated 10 minutes ago
Installation of the Native Personalization plugin in Content Studio.
Table of Contents
The Native Personalization plugin connects CoreMedia Studio with the Engagement Cloud. You can examine the metrics of your pages directly in CoreMedia Studio or create new segments and variants, for example. See the other articles in this section for more information on how to use the plugin.
|
To use Native Personalization, you need to have an Engagement Cloud licence. If you do not have a licence, contact your Key Account Manager or the CoreMedia Support for details. |
Prerequisites
To install and configure the plugin you need the following prerequisites:
-
CMCC v.13.2512.1.0 system or higher.
-
Access to the CoreMedia contributions repository on GitHub. If you do not have access, contact the CoreMedia Support.
-
Engagement Cloud account with a Webcare ID. Contact the CoreMedia Support for a password and the tag URL.
-
Blueprint workspace or Studio Client workspace ready.
Steps
1. Adding the Native Personalization Plugin to Studio Client
This Studio Plugin includes a Studio Client customization. It extends the CoreMedia Studio UI with new analytics and personalization features and connects to the Engagement Cloud. It also contains a Studio Server customization.
To bundle this plugin with your application Docker images, you can provide plugin-descriptors in the
plugin-descriptors directory or reference them as URLs in plugin-descriptors.json in the CoreMedia Blueprint workspace.
-
Find the latest Native Personalization Plugin release on GitHub: coremedia-contributions/perso-plugin/releases.
-
Copy the URL of the file
perso-plugin-x.y.z.jsonto the clipboard. -
Go to
workspace-configuration/plugins. -
Add the URL of the plugin-descriptor to the
plugin-descriptors.jsonfile.For example:
-
Execute
mvn generate-resources. -
Commit the changes.
-
Build the
studio-clientapplication. -
build the
studio-serverapplication.
2. Configuring the Engagement Cloud Connection
The Content Studio core contains the functionality to connect to the Engagement Cloud. This is required for the Native Personalization plugin to work. The following properties are required to configure the Engagement Cloud connection:
-
cmec.default-password: The password for the Engagement Cloud connection. If you do not have the password, ask the support. -
cmec.default-webcare-id: The Webcare ID for the Engagement Cloud connection. -
cmec.default-region: The region for the Engagement Cloud connection, for example,we1for the first European region. -
cmec.enabled: Set this property totrueto enable the Engagement Cloud connection. This property must be set during deployment and cannot be set in a settings content item.
In Engagement Cloud Integration Properties chapter in the Deployment manual you will find the available properties. Most of the properties are optional, and have sensible default values. You can use the "by-site" properties to configure the Engagement Cloud connection for each site root page that uses Engagement Cloud.
You have three main options to configure the Engagement Cloud connection for your sites, mostly depending on your deployment method.:
-
Configure the properties as Spring properties at start time.
-
Configure the properties in a YAML file for Docker deployment.
-
Configure the properties in a settings content item in Studio.
Keep in mind that cmec.enabled must be set during deployment and cannot be set in a settings content item.
|
Find details in the following tabbed component.
The format of the properties varies depending on the deployment method. The following tabs show the different formats:
-
YAML for Docker deployment
-
Spring for direct start
-
Content Settings for Studio
You can create your own YAML file, for example cmec.yml, put it into the global/deployment/docker/compose directory, and add it to the list of compose files in your .env file:
COMPOSE_FILE=…:compose/cmec.yml
studio-server:
  environment:
    # Whether the Engagement Cloud integration is enabled.
    CMEC_ENABLED: ${CMEC_ENABLED:-false}

    # The default webcare id to use.
    CMEC_DEFAULTWEBCAREID: ${CMEC_WEBCARE_ID?err}

    # The default Engagement Cloud password.
    CMEC_DEFAULTPASSWORD: ${CMEC_PASSWORD?err}

    # The default Engagement Cloud region.
    CMEC_DEFAULTREGION: ${CMEC_REGION:-we1}
cmec.enabled=false
cmec.default-webcare-id=${CMEC_WEBCARE_ID}
cmec.default-password=${CMEC_PASSWORD}
cmec.default-region=${CMEC_REGION}Use a Settings content item in Studio to configure the Engagement Cloud connection. The properties must be defined in a Struct property named "engagement" as shown below.
This content item can be linked from all site root pages that use Engagement Cloud.
engagement
    webcareId=<your-webcare-id>
    password=<your-password>
    region=<your-region>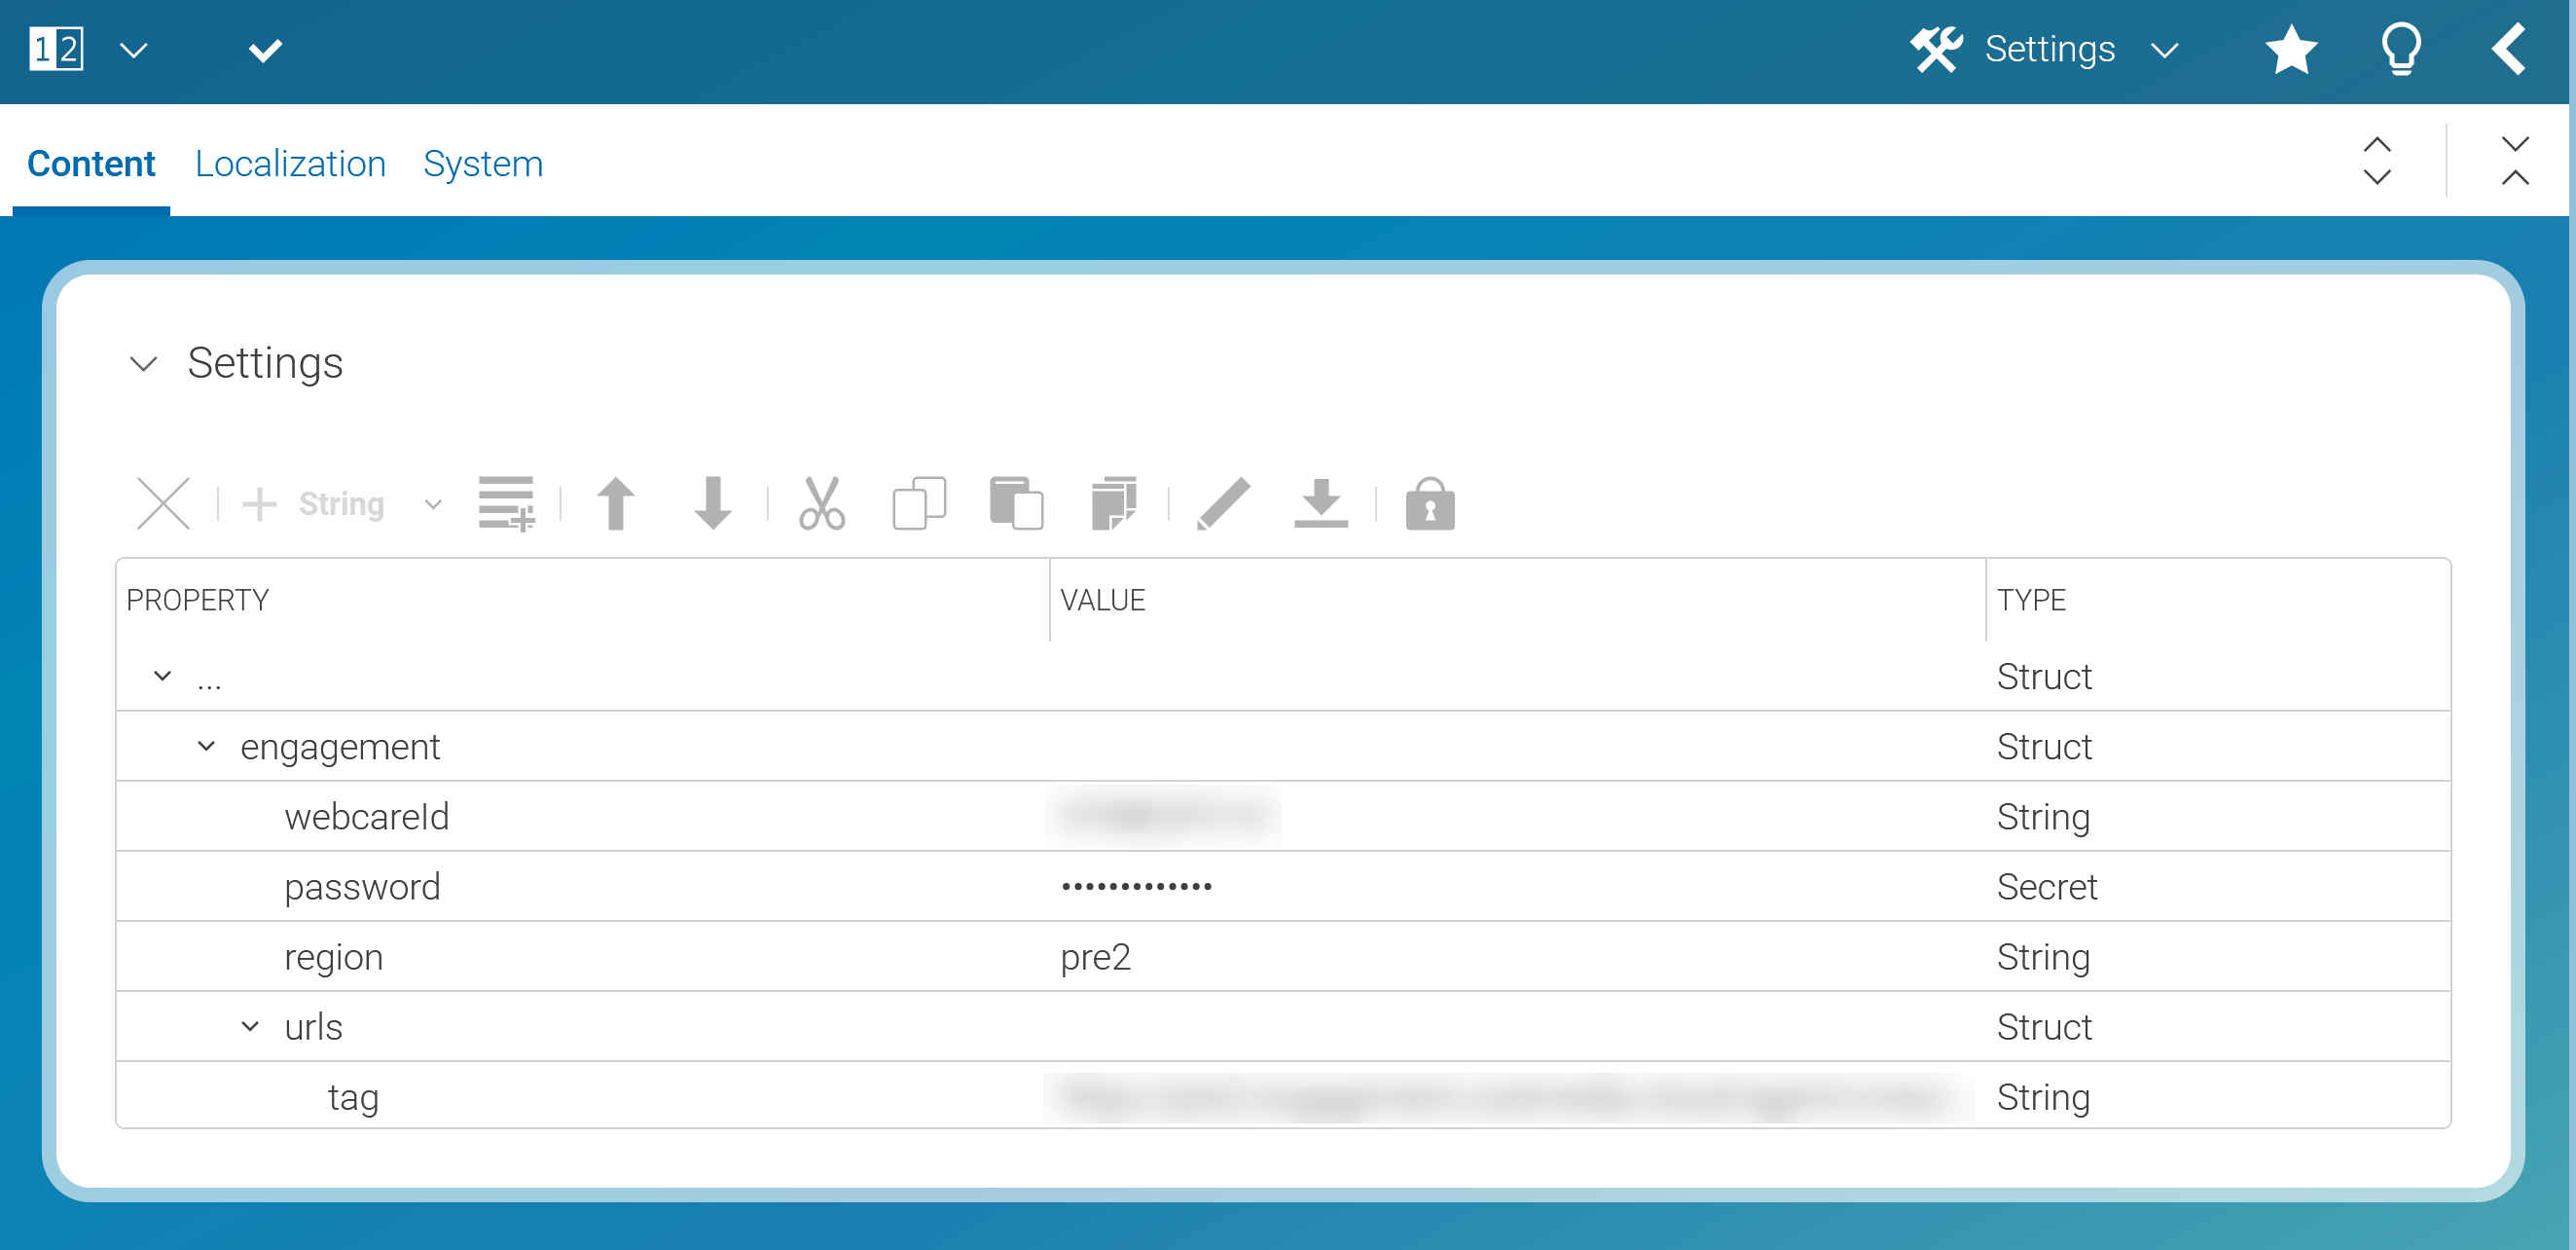
Figure 1. Configure the EC connection
| If you are missing some of the property values, contact the CoreMedia Support. |
3. Configuring User Groups
You have two dedicated groups in Engagement Cloud (EC) that you map to groups in Content Cloud (CC):
-
ec-viewer– lets users view metrics in Content Studio. -
ec-manager– lets users manage segments in Engagement Cloud. It also includes allec-viewerpermissions, so these users can view metrics as well.
In principle the mapping works the same way for both EC groups. To create it, use the properties cmec.group-mapping.cmcc and cmec.group-mapping.cmec (see
Engagement Cloud Integration Properties):
map a Content Cloud group on the cmcc side and the corresponding Engagement Cloud group on the cmec side, using the same last key segment to link the two. You can map multiple Content Cloud groups by repeating the pair with a different last key segment.
The last part of the property key (for example metricsViewers or segmentManagers) is arbitrary and case-insensitive — use speaking names so the intent of each mapping stays clear.
Replace <ContentCloudGroupName> and OtherContentCloudGroupName with the name of the user group in Content Cloud you want to use. For example, "staff" for ec-viewer and "administratoren" or "global-site-manager" for ec-manager.
The format of the properties varies depending on the deployment method. The following tabs show the different formats:
-
Spring Properties
-
Docker Settings
# Map two Content Cloud groups to the EC viewer group (view metrics)
cmec.group-mapping.cmcc.metricsViewers=<ContentCloudGroupName>
cmec.group-mapping.cmec.metricsViewers=ec-viewer
cmec.group-mapping.cmcc.metricsViewers1=<OtherContentCloudGroupName>
cmec.group-mapping.cmec.metricsViewers1=ec-viewer

# Map a Content Cloud group to the EC manager group (manage segments)
cmec.group-mapping.cmcc.segmentManagers=<ContentCloudGroupName>
cmec.group-mapping.cmec.segmentManagers=ec-manager
studio-server:
environment:
# Map a Content Cloud group to the EC viewer group (view metrics)
CMEC_GROUPMAPPING_CMCC_METRICSVIEWERS: <ContentCloudGroupName>
CMEC_GROUPMAPPING_CMEC_METRICSVIEWERS: ec-viewer
CMEC_GROUPMAPPING_CMCC_METRICSVIEWERS1: <OtherContentCloudGroupName>
CMEC_GROUP_APPING_CMEC_METRICSVIEWERS1: ec-viewer
# Map a Content Cloud group to the EC manager group (manage segments)
CMEC_GROUPMAPPING_CMCC_SEGMENTMANAGERS: <ContentCloudGroupName>
CMEC_GROUPMAPPING_CMEC_SEGMENTMANAGERS: ec-manager4. Adding Native Personalization to your sites
Adding Native Personalization to your CAE based site
If you use the CAE for content delivery, it is easy to add the Native Personalization functionality to your site.
In the Frontend Workspace, simply add the p13n-dynamic-include brick to your theme.
This brick does all the heavy-lifting. It adds the CoreMedia tag for selecting usage data and selects the correct content
for segments and A/B tests.
Adding Native Personalization to your Headless Server site
You can use GraphQL queries to get variant and baseline information. Take a look into the Headless Server Manual to get detailed information on how to use the GraphQL queries for Native Personalization. In order to use information from the Engagement Cloud, have a look into this JavaScript code from the CAE: p13n-callback.js
Now, you can start the Studio Server and Studio Client applications. The Native Personalization plugin is now available in CoreMedia Studio, and you will see the metrics tabs and widget in the Studio UI. You can use Variants for segmentation and A/B testing, and you can create new segments in the Engagement Cloud.
Is this page useful?