


Blueprint Developer Manual / Version 2101
Table Of ContentsCoreMedia Blueprint provides additional buttons and actions to create new content besides the regular content creation action in the library. The user can click on the "Create content" menu on the favorites toolbar to open a selection of documents to create. The action is also available for link lists and several dialogs.
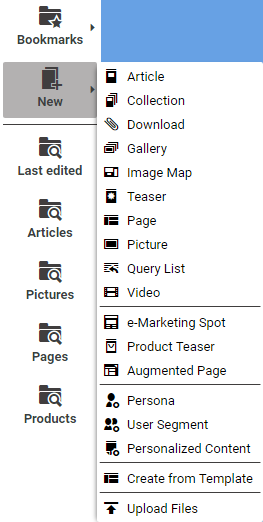
The user selects a content to create from the menu of the favorites toolbar. Afterwards, a dialog opens where (at least) the document name and folder can be set.
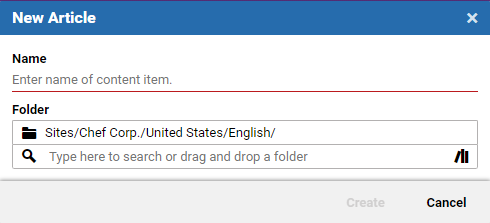
The user can decide if the content should be opened in a tab afterwards. The checkbox for this
is enabled by default. The Name and Folder properties
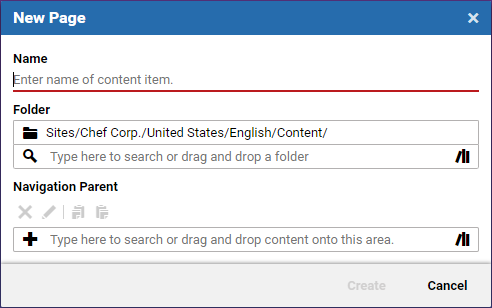
are the mandatory fields of the dialog. Depending on the content type the dialog shows different
property editors, for example for Page content items, the additional
field Navigation Parent is configured so that the user can select the
navigation parent of the new page.
The dialog can be extended in several ways and plugged into existing components using the predefined menu item or button components which will invoke the dialog. Also, the dialog provides a plugin mechanism for new property editors and allows you to customize the post-processing after the content creation, depending on the type of the created content. The following "How To" sections describe how to configure and customize the dialog.
How to add a 'New Content' menu item to the favorites toolbar
There are already some entries defined for this menu, most of them configured in the class
BlueprintFormsStudioPlugin.exml. The menu can be extended using the
quickCreateMenuItem:
<bp:newContentMenu>
    <plugins>
      <ui:addItemsPlugin>
    <ui:items>
  <bpb-components:quickCreateMenuItem contentType="MyDocumentType"/>
    ...
Separators can be added by:
<menuseparator cls="fav-menu-separator"/>
How to add a 'New Content' menu item to link list
There are two ways to add the content creation dialog to link lists. First is using the
QuickCreateToolbarButton class and apply it to an existing link list
using the additionalToolbarItems plugin. This will add one button to the
toolbar of the link list to create a specific content type, for example creating a new child for
the CMChannel document hierarchy:
<bp:extendedLinkListPropertyField bindTo="{config.bindTo}"
                                    propertyName="children">
    <bp:additionalToolbarItems>
    <tbseparator/>
    <bpb-components:quickCreateToolbarButton contentType="CMChannel" />
  </bp:additionalToolbarItems>
</bp:extendedLinkListPropertyField>
Example 6.2. Add content creation dialog to link list with
quickCreateLinkListMenu

The second variant is that you apply a complete dropdown menu with several content types in it.
By default, these content types are configured in the file
QuickCreateSettings.properties that is part of the
blueprint-base and overwritten with the file
NewContentSettingsStudioPlugin.properties (see
BlueprintFormsStudioPlugin.exml). The file contains a property
default_link_list_contentTypes which contains the document types to
display in a comma separated value format. This default can be overwritten by adding the
contentTypes attribute to the
quickCreateLinklistMenu element when the dropdown elements are declared
in exml. The attribute value can have a comma separated format to support multiple content types
too:
<bp:extendedLinkListPropertyField bindTo="{config.bindTo}"
  propertyName="header">
  <bp:additionalToolbarItems>
    <tbseparator/>
    <bpb-components:quickCreateLinklistMenu bindTo="{config.bindTo}"
                              contentTypes="CMArticle,CMTeaser,..."
                              propertyName="children" />
    </bp:additionalToolbarItems>
</bp:extendedLinkListPropertyField>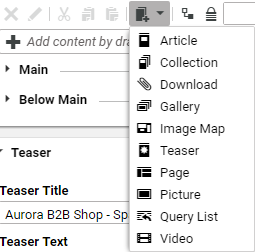
How to link new content to a link list
When the dialog is added to the toolbar of a link list by using the button component of the
menu, the newly created content is automatically linked to the list. The dialog checks during
the post-processing if the parameters propertyName" and
bindTo have been passed to it and will link the new content to the
existing ones. The dialog always assumes that if these two parameters have been passed, the
corresponding property is a link list, so using other properties with other types here will
raise an error here.
How to add an event handler to the button or menu item
Both components, the quickCreateLinkListMenu and the
quickCreateToolbarButton provide a configuration parameter called
onSuccess. The method passed there will be executed after a successful
content creation and must provide the signature:
method(content:Content, data:ProcessingData, callback:Function)
The ProcessingData instance "data" contains all the data entered by the
user for the mandatory and optional properties of the dialog. The object is a
Bean instance, so the values can be accessed by using
data.get(<KEY>) calls. Since the new content dialog has already applied
all dialog properties to the content, the retrieved new content instance already contains all
inputted data.

Caution
Ensure that the callback handler is called once the post-processing is finished. Otherwise, the post-processing of the content can not terminate correctly and steps may be missing.
How to add a content property to the new content dialog
A new property editor that should be mapped to a standard content property can be defined in the
file NewContentSettingsStudioPlugin.properties. The configuration entry
supports a comma separated format in order to apply multiple property fields to the dialog. For
example when the configuration entry item_CMArticle=title,segment is added
to the properties file, each time the dialog is opened for a CMArticle
document the String properties "title" and "segment" are editable in the dialog and will be
applied to the new content.
Caution
Currently only text fields are supported, so do not configure a content property here that has a different format than "String".
How to add an event handler for a specific content type
The new content dialog allows you to apply a content type depending success handlers that are executed for every execution of the dialog. The success handler must implement the following signature:
method(content:Content, data:ProcessingData, callback:Function)
and is applied to the dialog by invoking:
QuickCreate.addSuccessHandler(<CONTENT_TYPE>, <METHOD>);
Caution
Unlike the onSuccess handler described in the previous section, these types of event handlers will be executed for every content creation of a specific type, no matter how and where the new content dialog is invoked from.
How to add a custom property to the new content dialog
Sometimes it is necessary to configure a value for the dialog that is not a content property.
Instead, the value should be processed in the success handler. The dialog allows you to apply
new editors to the dialog that are mapped to a specific field in the
ProcessingData instance.
To apply a custom editor a corresponding factory method has to be implemented that will create the editor every time the dialog is created. This factory method is applied to the dialog then by invoking:
QuickCreate.addQuickCreateDialogProperty(<CONTENT_TYPE>,
  <CUSTOM_PROPERTY>,
  function (data:ProcessingData, properties:Object):Component {
  ...
  //for example return new CustomEditor(customEditor{properties});
  });
The ProcessingData instance is a bean, so it can be used to create
ValueExpressions that are passed as parameters to the component. The
predefined parameters are already applied to the properties object that
is passed to the factory method. Additional properties can be added to this object, like the
emptyText of an input field.
Caution
Make sure that the name of the custom property is unique and does not match an existing property of the given content type.
Since the new editor is shown for each dialog creation of the specific type, a success handler must be applied to the dialog too that processes the value:
QuickCreate.addSuccessHandler(<CONTENT_TYPE>,
    <myPostProcessingHandler>);
The processing handler must implement the same method signature like the ones defined for menu items or buttons:
method(content:Content, data:ProcessingData, callback:Function)
The custom property can be access in the handler by invoking:
data.get(<CUSTOM_PROPERTY>)

Note
The post-processing of the dialog will execute the following steps:
create the new content
apply values to property fields (default processing)
invoke success handlers for custom processing (methods that have been applied through
QuickCreate.addSuccessHandler)invoke success handler configured for the button or menu items (methods that have been applied by declaring a value for the
onSuccessattribute)link content to a link list if parameters are defined
open created content
open additional content in background
Where do I find some examples?
Check the class CMChannelExtension.as. The class adds a
successHandler for the creation of new CMChannel
documents that is used to apply a value for the title property.
Additionally, the newly created CMChannel document is also linked to a
parent (if available) that may have been provided by the
NavigationLinkFieldWrapper component that also has been added to the
dialog.
