


Studio Developer Manual / Version 2107
Table Of Contents
The way to easily customize and extend CoreMedia Studio is by using
plugins. The studio and extension modules in the
CoreMedia Blueprint workspace demonstrate the usage of the plugin mechanism,
and define several plugins for Studio.

Caution
Note that a Studio plugin is not to be confused with an Ext JS component plugin. The former is an application-level construct; Studio plugins are designed to aggregate various extensions (custom UI elements and their functional code, together with the required UI elements to trigger the respective functionality). The latter means a per-component plugin and is purely an Ext JS mechanism. This section deals with Studio plugins; Ext JS plugins are described in Section 5.1.2, “Component Plugins”. In this manual, the terms Studio plugin and component plugin are used, respectively, to avoid ambiguity.
Examples for CoreMedia Studio extension points that plugins may hook into are:
Localization of document types and properties
Custom forms for document types
Custom collection thumbnail view, and custom columns in collection list view
Custom tab types (example in Blueprint: Taxonomy Manager tab)
Custom library search filters
Allowed image types and respective blob properties for drag and drop into rich text fields
Additional extensions to extension menu
Document types without a valid preview
A plugin for CoreMedia Studio usually has the following structure:
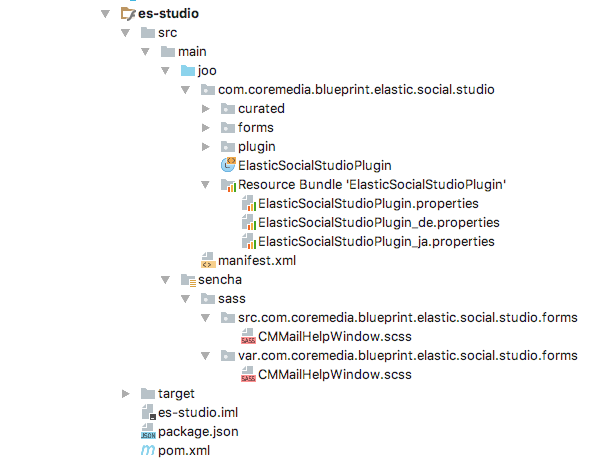
The example above depicts the layout of a typical Studio module in the
CoreMedia Blueprint workspace.
All plugins contain a pom.xml file that defines the dependencies of the plugin. The actual source code
goes into the subdirectories joo and sencha. The former contains MXML and ActionScript code,
the latter Sass files in the sass subfolder and additional static resources such as images or CSS files
in the resources subfolder not shown in the example. The package.json file registers the
Studio plugin, see further below.
The module es-studio, for example, has a main package
com.coremedia.blueprint.elastic.social.studio and holds a resource bundle, and
the file ElasticSocialStudioPlugin.mxml declaring the plugin and its applicable rules and configuration.
It is recommended to put the source of your plugin into a custom package. This package is
reflected in the folder structure below joo. The package name for the example above
is com.coremedia.blueprint.elastic.social.studio as it is CoreMedia
Blueprint's Elastic Social Studio plugin.
Each plugin is described in an MXML file like ElasticSocialStudioPlugin.mxml. This file declares
the plugin's rule definitions (that is the various Studio extension points that this
plugin hook into) and configuration options. Typically, that MXML file is sufficient for a plugin declaration.
However, if you want to run arbitrary ActionScript code as part of your plugin's initialization
phase, you can also introduce an ActionScript base class. In this case, you need to declare that
base class in your main MXML file, make your base class extend StudioPlugin, and
then override the init() method in your base class.
The Main Class
The main class of a plugin can either be defined as ActionScript code or as MXML.
In the example in Figure 7.1, “Plugin structure” the main class is
ElasticSocialStudioPlugin as MXML. For your own
plugins, it is recommended to use a name schema like <your plugin
name>StudioPlugin.
The main class for a plugin must implement the interface com.coremedia.cms.editor.sdk.EditorPlugin.
The interface defines only one init() method that receives a context object implementing
IEditorContext as its only parameter, which is supposed to be used to configure
CoreMedia Studio.
In ActionScript, you can simply implement the interface in your source code.
In MXML you can also implement interfaces with the attribute implements. Studio provides a base MXML
element to inherit from, namely <editor:StudioPlugin> which not only implements the
IEditorContext interface, it also delegates the init() call to all Studio plugins
specified in its configurations config option.
The IEditorContext instance handed in to the init() method
can be used for the following purposes:
Configure which document types can be instantiated by the CoreMedia Studio user. This basically restricts the list of content types offered after clicking on the Create Document Icon in the Collection View (see Section 7.3.6, “Excluding Document Types from the Library” for details). Note that only those documents are offered in the create content menu that the current user has the appropriate rights for in the selected folder - excluded document types will be placed on top of that rule (that is, you can exclude document type X from the menu even when the user has technically the rights to create documents of type X).
Configure image properties for display in the thumbnail view and for drag and drop
Register hooks that fill certain properties after initial content creation (see Section 7.3.7, “Client-side initialization of new Documents” for details)
Add properties to the localization property bundles, or override existing properties (see Section 7.2, “Localizing Labels” for details)
Get access to the central bean factory and the application context bean
Get access to the REST session and indirectly to the associated repositories
Register content types for which Studio should not attempt to render an embedded preview
Register a transformer function to post-process the preview URL generated for an existing content item for use in the embedded preview
Get access to persistent per-user application settings, such as the tabs opened by the user or custom search folders
Register symbol mappings for pasting external text from the system clipboard into a RichText property field, which can be useful when you have to paste documents from Microsoft Word with special non-standard characters
Note that a Studio plugin's init() method is allowed to perform asynchronous calls,
which is essential if it needs server-side information (access user, groups, Content, and so on)
during initialization. CoreMedia Studio waits for the plugin to
handle all callbacks, only then the next plugin (if any) is initialized and eventually,
CoreMedia Studio is started. However, you cannot use
window.setTimeout() or window.setInterval() in Studio plugin
initialization code!
Plugin Rules
The other essential part of a CoreMedia Studio plugin is the plugin
rules it declares in its <ui:rules> element. Plugin rules are applied to
components whenever they are created, which allows you to modify behavior of standard
CoreMedia Studio components with component plugins. The
ElasticSocialStudioPlugin plugin, for example, declares rules that add document forms
for elastic social.
The studio plugin file consists of one "rules" element that contains component elements. The components can be either identified by their global id or by namespace and xtype. For the latter case, you need to declare the required namespace(s) in the root tag of the plugin file. You can read a Studio plugin rule like this: "Whenever a component of the given xtype is built, add the following component plugin(s)."
You can use predefined Ext JS component plugins to modify framework components.
The ElasticSocialStudioPlugin plugin, for example, uses the
AddItemsPlugin to add document forms to the CommentExtensionTabPanel.
In the ElasticSocialStudioPlugin, custom forms for the elastic social
document types are added by using the AddTabbedDocumentFormsPlugin (which is a
component plugin).
Caution
While in simple cases, the items to add can be specified directly inline in the Studio plugin MXML file, this is generally not recommended.
The reason is that the Studio plugin class is instantiated as a singleton, and all MXML elements that represent objects that are not components or plugins, most prominently Actions, are instantiated immediately, too. This means that Actions are instantiated (too) early, and that a plugin rule may be applied several times with the same Action instance, leading to unexpected results.
The best practice is to move the whole component plugin to a separate MXML file and reference this new plugin subclass from the Studio plugin rule. Since the new plugin is referenced by its ptype, a new plugin instance and thus a new Action instance is created for each application of the plugin rule as expected.
The Ext JS plugins of any component are executed in a defined order:
Plugins provided directly in the component definition are initialized
Plugins defined in Studio plugin rules, starting with the plugins for the most generic applicable
xtype, then those with successively more specificxtypes.Plugins configured for the component's ID
If that specification does not unambiguously decide the order of two plugins, plugins registered earlier are executed earlier. To make sure that a certain module's Studio plugins are registered after another module's Studio plugin, the former module must declare a Maven dependency on the latter module. This way, the Studio plugins run and register in a defined order.
For your own Studio plugin, you might want to use the file from the CoreMedia
Project workspace as a starting point. The name of the Studio plugin file should
reflect the functionality of the plugin, for example
<My-plugin-Name>StudioPlugin.mxml for better readability.
The following example shows how a button can be added to the actions toolbar on the right side of the work area:
<editor:StudioPlugin xmlns...>
  <editor:rules>
    ...
    <editor:ActionsToolbar>
      <editor:plugins>
        <my:AddActionsToolbarItemsPlugin/>
      </editor:plugins>
    </editor:ActionsToolbar>
    ...
  </editor:rules>
</editor:StudioPlugin>
Example 7.1. Adding a plugin rule to customize the actions toolbar
Because it is embedded in the element <editor:ActionsToolbar> in the above
declaration, your custom plugin <my:AddActionsToolbarItemsPlugin> will be
added to all instances of the ActionsToolbar class.
Your custom plugin is defined in a separate MXML file AddActionsToolbarItemsPlugin.mxml
that configures an <addItemsPlugin> to add a separator and a button with a
custom action to the ActionsToolbar at index 5:
<ui:AddItemsPlugin index="5">
  <ui:items>
    <TbSeparator/>
    <Button>
      <baseAction>
        <my:MyAction .../>
      </baseAction>
    </Button>
  </ui:items>
</ui:AddItemsPlugin>
Example 7.2. Adding a separator and a button with a custom action to a toolbar
While you can insert a component at a fixed position as shown above, it might also make sense to
add the component after or before another component with a certain (global) ID, itemId, or
xtype. To that end, the AddItemsPlugin allows you to specify pattern objects so that
new items are added before or after the represented objects. If the component you want to use as
an "anchor component" is not a direct child of the component you plug into, you can set the
recursive attribute in your rules declaration to true.
When the component you want to modify is located inside a container that is also
a public API extension point, you might have to access that container's API to provide
context for your customizations.
A typical use case for this is that you want to add a button to a toolbar that is nested below a
container, but you need to apply your plugin rule to the container (and not the toolbar),
because you need to access some API of that Container to configure the items to add
(for example, access to the current selection managed by that container), or
because the toolbar is reused by other containers, and you want your button to only appear in
one specific context. Some Studio components define public API
interfaces for accessing the runtime component instance, for example
<editor:CollectionView> creates a component that is documented to implement
the public API interface ICollectionView (package
com.coremedia.cms.editor.sdk.collectionview).
To express such nested extension point plugin rules, there is the plugin
<ui:NestedRulesPlugin>. Its usage is similar to CoreMedia Studio plugin rules,
namely is must contain an element <ui:rules> that again contains nested plugin
rules. A nested plugin rule consists of the element of the subcomponent to locate with an
optional itemId, which in turn contains a <plugins> element with
the plugins to add to that component. Typical plugins to use here are
AddItemsPlugin, RemoveItemsPlugin, and ReplaceItemsPlugin,
all located in namespace exml:com.coremedia.ui.config.
For example, assume that to every LinkList property field, you want to add a custom action that needs
access to the current selection of content items in the LinkList given as a config option
contentValueExpression of type ValueExpression.
Like in the example above, you have to add a custom plugin to a CoreMedia Studio extension point in
your CoreMedia Studio plugin MXML file:
<editor:StudioPlugin>
  <editor:rules>
    ...
    <editor:LinkListPropertyField>
      <editor:plugins>
        <my:CustomizeLinkListPropertyFieldPlugin/>
      </editor:plugins>
    </editor:LinkListPropertyField>
    ...
  </editor:rules>
</editor:StudioPlugin>
Example 7.3. Adding a plugin rule to customize all LinkList property field toolbars
Now, in your plugin CustomizeLinkListPropertyFieldPlugin.mxml, instead of using
<ui:AddItemsPlugin> directly, you apply <ui:NestedRulesPlugin>
to locate the toolbar you want to customize.
Still, the component you plug into is a LinkList property field, and when your custom plugin
is instantiated, that component is instantiated, too, and handed in as the config option
component.
It is good practice to assign the LinkList property field component as well as its initial
configuration (when needed) to typed local MXML variables to avoid repeating longish expressions
and type casts in inline code.
<ui:NestedRulesPlugin xmlns:fx="http://ns.adobe.com/mxml/2009"
                      xmlns:exml="http://www.jangaroo.net/exml/0.8"
                      xmlns="exml:ext.config"
                      xmlns:ui="exml:com.coremedia.ui.config"
                      xmlns:editor="exml:com.coremedia.cms.editor.sdk.config"
                      xmlns:my="exml:...">

  <fx:Script><![CDATA[
    import com.coremedia.cms.editor.sdk.premular.fields.LinkListPropertyField;
    import com.coremedia.cms.editor.sdk.premular.fields.LinkListPropertyFieldToolbar;

    private var linkListPropertyField:LinkListPropertyField;
    private var linkListPropertyFieldConfig:LinkListPropertyField;
    private var config:CustomizeLinkListPropertyFieldPlugin;

    // called by generated constructor code
    private function __initialize__(config:CustomizeLinkListPropertyFieldPlugin):void {
      linkListPropertyField = config.cmp as LinkListPropertyField;
      linkListPropertyFieldConfig = linkListPropertyField.initialConfig as LinkListPropertyField;
    }

    public native function CustomizeLinkListPropertyFieldPlugin(config:CustomizeLinkListPropertyFieldPlugin = null);
    ]]></fx:Script>

  <ui:rules>
    <editor:LinkListPropertyFieldToolbar>
      <editor:plugins>
        <ui:AddItemsPlugin>
          <ui:items>
            <TbSeparator/>
            <ui:IconButton>
              <ui:baseAction>
                <my:MyAction
                  contentValueExpression=
                    "{linkListPropertyField
                        .getSelectedValuesExpression()}"
                  forceReadOnlyValueExpression=
                    "{linkListPropertyFieldConfig
                        .forceReadOnlyValueExpression}"/>
              </ui:baseAction>
            </ui:IconButton>
          </ui:items>
          <ui:before>
            <Component
              itemId="{LinkListPropertyFieldToolbar
                         .LINK_LIST_SEP_FIRST_ITEM_ID}"/>
          </ui:before>
        </ui:AddItemsPlugin>
      </editor:plugins>
    </editor:LinkListPropertyFieldToolbar>
  </ui:rules>
</ui:NestedRulesPlugin>
Example 7.4. Using <ui:NestedRulesPlugin> to customize a subcomponent using its container's API
Note how the above code makes use of the MXML element
LinkListPropertyFieldToolbar to locate the toolbar inside the
LinkListPropertyField, as well as to use an ..._ITEM_ID
constant from that config class to specify the new items' location.
As another example, assume you want to create your own component inheriting from
<editor:LinkListPropertyField>. You want to reuse the default toolbar that the standard
link list component defines, but you want to add one additional button to that toolbar.
In a very similar fashion to the example above concerning CoreMedia Studio plugins, you can
then write your custom component's MXML file like this:
<editor:LinkListPropertyField xmlns:ui="exml:com.coremedia.ui.config"
                              xmlns:editor="exml:com.coremedia.cms.editor.sdk.config"
                              xmlns:exml="http://www.jangaroo.net/exml/0.8"
                              xmlns:fx="http://ns.adobe.com/mxml/2009">

  <fx:Script><![CDATA[
    [Bindable]
    public var additionalToolbarItems:Array;

    private var config:UsingNestedRulesPlugin;

    public native function UsingNestedRulesPlugin(config:UsingNestedRulesPlugin = null);

    ]]></fx:Script>

  <editor:plugins exml:mode="append">
    <ui:NestedRulesPlugin>
      <ui:rules>
        <editor:LinkListPropertyFieldToolbar>
          <editor:plugins>
            <ui:AddItemsPlugin
              items="{config.additionalToolbarItems}"/>
          </editor:plugins>
        </editor:LinkListPropertyFieldToolbar>
      </ui:rules>
    </ui:NestedRulesPlugin>
  </editor:plugins>
</editor:LinkListPropertyField>
Example 7.5. Using <ui:NestedRulesPlugin> to customize a subcomponent
Note that when you inherit from a component and
use the <plugins> element to declare the plugins you want to apply to
this component, you overwrite the plugins definition of the component you inherit
from. That means that all the plugins that the super component defines would not be used in
your custom component. To avoid that, you have to set the mode attribute of the
plugins element to either append or prepend, which will
then add your custom plugin definitions to the end of the super component's declarations, or
insert them at the beginning, respectively.
You might also want to remove certain components from their containers. In that case, you can
add the RemoveItemsPlugin to the container component and remove items, again
identifying them by pattern objects that can specify id, item id, or xtype.
In order the replace an existing component, you can use the ReplaceItemsPlugin. For
this plugin, you specify one or more replacement components in the items property.
Each item must specify an id or an item id and replaces the existing component with exactly
that id or item id.
Finally, a custom CoreMedia Studio plugin needs to be registered with
the Studio application. This is done in the package.json file in the
module root folder. The purpose of this file is to add the fully qualified main plugin class to the list of
Studio plugins. For your own plugin, you need to change the fourth and fifth lines of the following example
accordingly:
{
  "studioPlugins": [
    {
      "mainClass": "com.coremedia.blueprint.studio.BlueprintFormsStudioPlugin",
      "name": "Blueprint Forms"
    }
  ]
}
Example 7.6. Registering a plugin
If your plugin should only be active for a certain group of users, you can add a requiredGroup
property to the plugin descriptor. The plugin will only be loaded if the user is a member of the given group.
The object created in the package.json file
may use the attributes defined by the class EditorPluginDescriptor,
especially name and mainClass as shown above.
In addition, the attributes requiredGroup and requiredLicenseFeature may be used.
You can also implement group specific and own conditions using the OnlyIf plugin. Find further
information in the ASDoc of com/coremedia/cms/editor/sdk/plugins/OnlyIf.
To recapitulate, this is a brief overview of the configuration chain:
Maven dependencies introduce Studio plugin modules to CoreMedia Studio.
Studio plugin modules register Studio plugins in the
package.jsonfile.Studio plugin rules definitions denote components by ID or xtype and add Ext JS plugins to those components.
The Ext JS plugins shown here change the list of items of the components. Any other Ext JS plugins can be used in the same way.
Load external resources
If you want to load external style sheets or JavaScript files into
Studio, you have to place them below the folder src/main/sencha/resources
in your module and add the file paths to the jangaroo-maven-plugin in your module POM file with the
configuration options additionalCssNonBundle and additionalJsNonBundle as follows:
      <plugin>
        <groupId>net.jangaroo</groupId>
        <artifactId>jangaroo-maven-plugin</artifactId>
        <version>${jangaroo.version}</version>
        <extensions>true</extensions>
        <configuration>
          <additionalCssNonBundle>
            <value>resources/path/to/myStylesheet1.css</value>
            <value>resources/path/to/myStylesheet2.css</value>
          </additionalCssNonBundle>
          <additionalJsNonBundle>
            <value>resources/path/to/myJavascript1.js</value>
            <value>resources/path/to/myJavascript2.js</value>
          </additionalJsNonBundle>
          ...
Example 7.7. Loading external resources
