


Studio Developer Manual / Version 2201
Table Of ContentsThe Apps Menu is part of the Side Bar that each Studio app has. It can be opened via the burger menu button in the top-left corner of a Studio app.
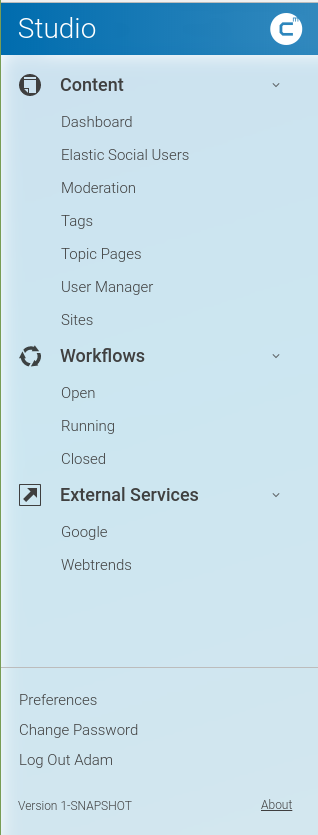
One speciality of the Apps Menu is that it includes entries from all Studio apps. For example, the entries under Workflows are shortcuts for the Workflow App while all others are shortcuts for the Main App. The entries should fulfil certain conditions:
- The entries need to be dynamic in the way that they are tied to the existence of their respective app. If for example the Workflow App was removed from the Studio client build, its Apps Menu shortcuts should also vanish.
- The shortcuts for an app need to be in the Apps Menu even if this app is not yet opened. For example, if a user worked with the main Studio and the Workflow App was not yet opened in a browser window/tab, the Workflow App shortcuts should still be present in the menu.
- The complete set of Apps Menu shortcuts should not be configured for each app separately as this does not scale with more apps. Instead, each app should just declare, which individual shortcuts it adds to the menu.
App Manifests
To meet the conditions from above, a customization approach based on app manifests was chosen. It is based on the Web standard Web App Manifests but adds some CoreMedia-specific attributes. Via its manifest, each app defines its shortcuts and all of them appear in all Apps Menus of all apps.
The manifest for a Studio app is assembled by the build process. To this end, multiple
modules can add app manifests fragments which are deep-merged to obtain the complete manifest.
Modules add their manifest fragments as part of their jangaroo.config.js file in the
module's root folder. The complete assembled manifest for an app lies under
APP_MODULE_PATH/build/manifest.webmanifest. In addition, the manifests
are locale-specific so that you also find the files manifest-de.webmanifest
and manifest-ja.webmanifest for German and Japanese.
App manifests contain a lot information but this section focuses on the shortcuts part of the manifests.
The grouping of shortcuts under the collapsible sections of the menu mainly
follows the question, which app defines the shortcuts. So they are grouped under
Content for the Main App and
Workflows for the Workflow App.
However, a cmCategory can be defined for a shortcut (see below).
For the apps menu, categories normally do not have an impact.
The exception is when you use the config option topLevelCategories of the AppsMenu. In that case
shortcuts of the configured categories are assembled under a joint section
alongside the sections for the apps.
For example, even though Google and Webtrends
are shortcuts of the Main App, they appear under External Services
in the menu because this category is configured to be a top level category.
Defining App Shortcuts
There are two kinds of app shortcuts, (1) app path shortcuts and (2) service shortcuts.
App Path Shortcuts
App path shortcuts assume that the app can deal with different app sub-paths.
For example, if you switch to the Pending Workflows overview list of the app, you can see
that the browser URL has the hash parameter #path=pending. So an app path
shortcut simply sets the path hash parameter of the app to a specific value and
assumes that the app reacts to this in some way.
Examples for app path shortcuts can be found in the manifest fragment for the Workflow App module (part of the core).
module.exports = jangarooConfig({
  ...
  appManifests: {
    de: {
      shortcuts: [
        {
          name: "Offen",
        },
        {
          name: "Laufend",
        },
        {
          name: "Abgeschlossen",
        },
      ],
    },
    en: {
      ...
      categories: [
        "Workflow",
      ],
      ...
      shortcuts: [
        {
          cmKey: "cmInbox",
          name: "Open",
          url: "inbox",
          icons: [
            {
              src: "appIcons/inbox_24.svg",
              sizes: "24x24",
              type: "image/svg",
            },
            {
              src: "appIcons/inbox_192.png",
              sizes: "192x192",
              type: "image/png",
            },
            {
              src: "appIcons/inbox_512.png",
              sizes: "512x512",
              type: "image/png",
            },
          ],
        },
        {
          cmKey: "cmPending",
          name: "Running",
          url: "pending",
          ...
        },
        {
          cmKey: "cmFinished",
          name: "Closed",
          url: "finished",
          ...
        },
      ],
    },
  },
  additionalLocales: [
    "de",
    "ja",
  ]
});
Example 9.3. App Path Shortcuts for the workflow app
An app path shortcut defines an url property that is exactly the value that will
be set for for the path hash parameter of the app's URL. In addition a name
and a unique cmKey are set.
Icons in different sizes for the shortcut are optional. If they
are provided they need to reside in the APP_MODULE_ROOT/sencha/appIcons folder
of the module.
The example also shows how different locales are handled. Only selected properties need to be overwritten, everything else is kept from the manifest of the base locale.
Service Shortcuts
The Main App does not handle app paths. Instead, service shortcuts are used. Service shortcuts do not change the app path in any way. Instead, an action inside the corresponding app is triggered to display something. An example is the Tags view of the Main App. Instead of setting a sub-path of the app, a new Studio tab for the Tags sub-app is opened.
To obtain this behaviour, first of all a corresponding service needs to be set up in the
associated app. For the Tags sub-app this is done in the TaxonomyStudioPlugin
in the Blueprint (Note: Non-public API is used here which will be resolved in the near future).
cast(StudioAppsImpl, studioApps._).getSubAppLauncherRegistry().registerSubAppLauncher("cmTaxonomy", (): void => {
  const openTagsAction = new OpenTaxonomyEditorAction();
  openTagsAction.execute();
});
Example 9.4. Registering a Service Method to Trigger the Tags App
A sub-app launcher is registered for the key cmTaxonomy which simply triggers the
OpenTaxonomyEditorAction.
With such a sub-app launcher service in place, service shortcuts can be added to the manifest.
For the example of the Tags sub-app, this is done in the
jangaroo.config.js file of the blueprint/apps/studio-client/apps/main/extensions/taxonomy
module itself.
module.exports = jangarooConfig({
  ...
  appManifests: {
    en: {
      ...
      cmServiceShortcuts: [
        {
          cmKey: "cmTaxonomy",
          cmCategory: "Taxonomy Manager",
          name: "Tags",
          url: "",
          icons: [
            {
              src: "packages/com.coremedia.blueprint__taxonomy-studio/appIcons/taxonomy_24.svg",
              sizes: "24x24",
              type: "image/svg",
            },
            {
              src: "packages/com.coremedia.blueprint__taxonomy-studio/appIcons/taxonomy_192.png",
              sizes: "192x192",
              type: "image/png",
            },
          ],
          cmAdministrative: true,
          cmService: {
            name: "launchSubAppService",
            method: "launchSubApp",
          },
        },
      ],
    },
  },
});
Example 9.5. Service Shortcut for the Tags Sub-App
The cmKey parameter must match the key that was used above when registering
a sub-app launcher. Under cmService you define that the sub-app launcher
mechanism should be used to bring the Tags sub-app to life.
