


Studio Developer Manual / Version 2201
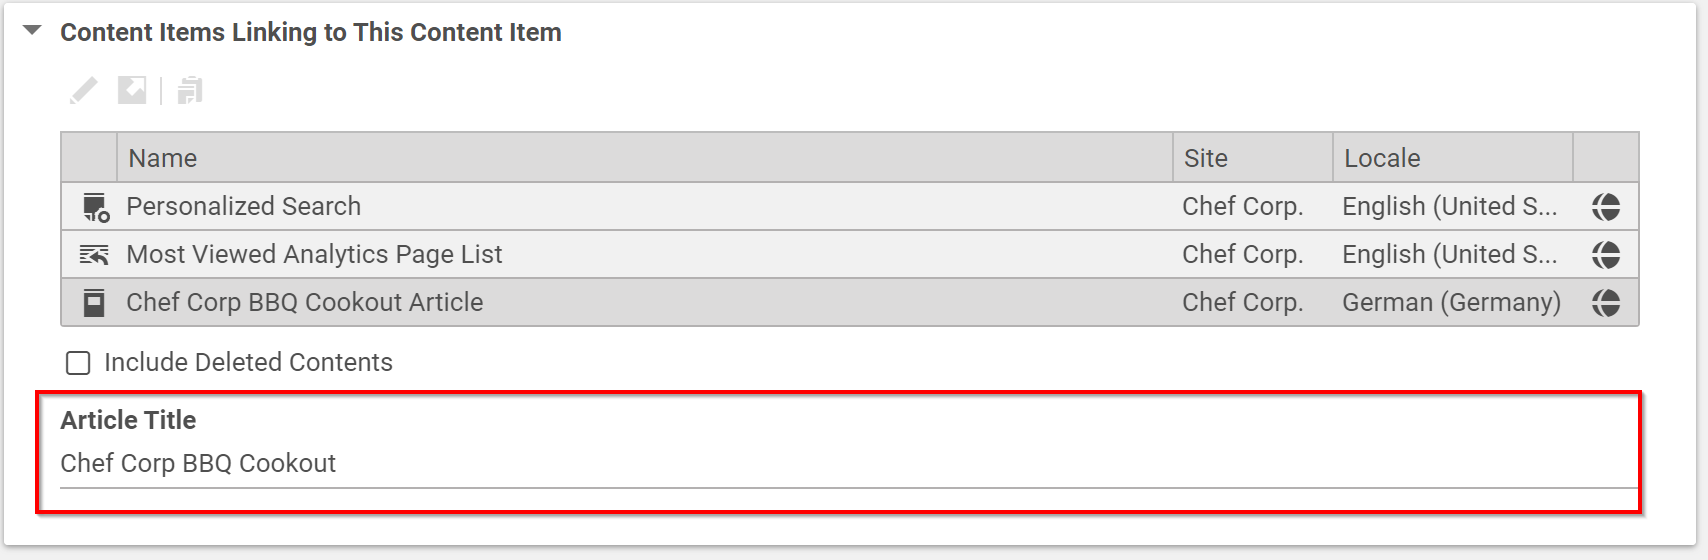
Table Of ContentsYou can customize many features of Studio with plugins. This section shows the deployment of a simple plugin into the Blueprint workspace. The plugin is only intended as an example and adds a string property to the Content Items Linking to this Content Item field of the System tab. The aim of this tutorial is to give you a working starting point, from which you can start exploring all details and features of Studio customization.
The required CoreMedia and third-party components, such as Content Servers, CAE and databases are running in the CoreMedia Docker environment.
Each of the following steps link to chapters which give more information about the described task. CoreMedia also recommends attending the CoreMedia Studio Customization training. See https://www.coremedia.com/en/services/training/coremedia-training-program/coremedia-studio-customization for details.
In order to check the prerequisites, get the Blueprint workspace, get licences, build the workspace and start the Docker environment. Follow the instructions in Section 3.2, “Quick Start” in Blueprint Developer Manual .
When you are finished with these tasks, you should have a Blueprint workspace where you can develop your plugin and a CoreMedia system running in Docker containers on your local machine.
Prepare your IDE for Studio development as described in Chapter 7, Developing with the Studio Client Workspace.
Create your plugin in the
apps/studio-client/apps/main/extensions/mycompany/myplugindirectory, using the pnpm Starter Kit (see Section 9.3, “Studio Plugins” for an in-depth description of Studio plugins and Section 4.4.3, “Developing with Studio” in Blueprint Developer Manual for pnpm configuration).pnpm create @jangaroo/project apps/studio-client/apps/main/extensions/mycompany/myplugin
The default choices of the command line tool should be sufficient. As a package name it makes sense to stick to the following naming pattern:
@MYCOMPANY/studio-client.main.MYPLUGIN. Regarding the versioning stick to Semantic Versioning.See Chapter 6, Structure of the Studio Client Workspace for more details on the created structure and files.
The functionality of your plugin will be defined via
*.tsfiles (in this caseExampleStudioPlugin.ts). The example adds a string property to the Content Items Linking to this Content Item field of the System tab. See the complete Chapter 9, Customizing CoreMedia Studio and the TSDoc for more customization features.Add dependencies to
@coremedia/studio-client.main.editor-components,@coremedia/studio-client.ext.ui-componentsand@jangaroo/runtimeto the recently created package by using:pnpm add --save-workspace-protocol=false @coremedia/studio-client.main.editor-components @coremedia/studio-client.ext.ui-components @jangaroo/runtime
After you have added and installed the dependencies, make sure to initially build to package using
pnpm run buildso thetsconfig.jsonis properly setup for syntax assist.Copy the code into the
src/ExampleStudioPlugin.tsfile.import StudioPlugin from "@coremedia/studio-client.main.editor-components/configuration/StudioPlugin"; import StringPropertyField from "@coremedia/studio-client.main.editor-components/sdk/premular/fields/StringPropertyField"; import ReferrerListPanel from "@coremedia/studio-client.main.editor-components/sdk/premular/ReferrerListPanel"; import AddItemsPlugin from "@coremedia/studio-client.ext.ui-components/plugins/AddItemsPlugin"; import Config from "@jangaroo/runtime/Config"; import ConfigUtils from "@jangaroo/runtime/ConfigUtils"; interface SimplePluginExample extends Config<StudioPlugin> { } class SimplePluginExample extends StudioPlugin { declare Config: SimplePluginExample; constructor(config: Config<SimplePluginExample> = null) { super(ConfigUtils.apply(Config(SimplePluginExample, { rules: [ // add your rules here... Config(ReferrerListPanel, { plugins: [ Config(AddItemsPlugin, { items: [ Config(StringPropertyField, { propertyName: "title", }), ] }), ], }), ], }), config)); } } export default SimplePluginExample;Example 4.1. SimplePluginExample.ts
To actually load the
Studio Client Pluginon startup you need to add the following entry to thejangaroo.config.jsfile:... module.exports = jangarooConfig({ ... sencha: { ... extNamespace: "mycompany.myplugin", studioPlugins: [ { mainClass: "mycompany.myplugin.SimplePluginExample", name: "Asset Management Extensions", }, ], } }); ...Example 4.2. jangaroo.config.js
To properly mark the package as an extension to be handled by the CoreMedia Extension Tool you need to add the following entry to the
package.jsonfile:Call the CoreMedia Extension Tool from the commandline in the workspace root directory. See Section 4.1.5, “Project Extensions” in Blueprint Developer Manual for a description of extensions and the extensions tool.
mvn -f workspace-configuration/extensions extensions:sync -Denable=mycompany
The tool will add your plugin to the following files:
apps/studio-client/pnpm-workspace.yamlapps/studio-client/apps/main/extension-config/extension-dependencies/package.json
Install and build the studio-client from the root of your workspace:
pnpm install
pnpm -r run build
Start Studio locally on your machine from the
apps/studio-client/global/studiodirectory:pnpm run start -- --proxyTargetUri http://docker.localhost:41080
Enter
http://localhost:3000in your browser. Studio should open. Log in and open an article. You will see an additional property field.
Now, you have created your first - very simple - running Studio extension and learned about the required structure
and tools. From this starting point, you might now extend your plugin.
See Section 8.3, “Debugging” for details on how to debug the application. When you are finished, you only have
to build your plugin, not the complete studio-client package.
From the plugin directory simple call:
pnpm run build
