


Blueprint Developer Manual / Version 2210
Table Of Contents
To enable tagging of content two properties are available the CMLinkable content
type.
subjectTaxonomy
| |
| Type | Link list
|
| Description | Subject(s) / topic(s) of that content item |
locationTaxonomy
| |
| Type | Link list
|
| Description | Geographic location(s) of that content item |
Table 5.8. CMLinkable Properties for Tagging
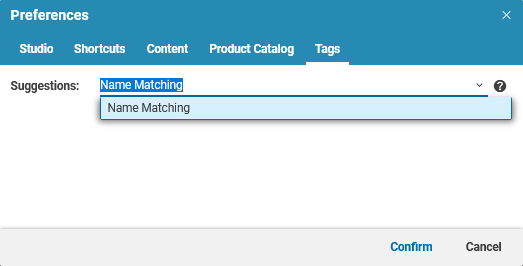
Editors can assign taxonomies to content items using CoreMedia Studio and the Blueprint taxonomy property editor. It allows for the following:
adding/removing references to taxonomy
autocompletion
suggestions
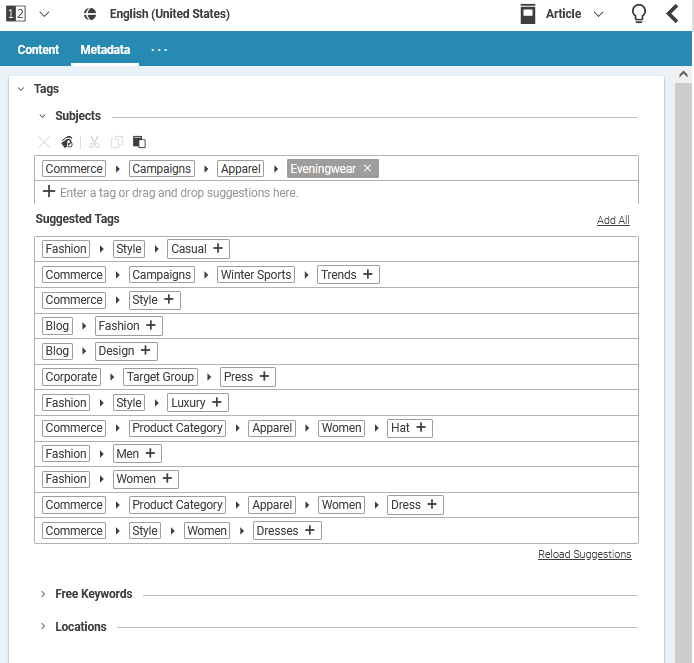
The user can add taxonomy keywords to the corresponding property link list using the taxonomy property editor. The editor also provides suggestions that are provided by the OpenCalais integration or a simple name matching algorithm. The strategy type can be configured in the preferences dialog of CoreMedia Studio.
How taxonomies are loaded
A Blueprint taxonomy tree is built through content items located in a specific folder of the content repository. The default taxonomy resolver will then look for a "_root" settings content item inside these folders and uses the taxonomy content items linked inside the LinkListProperty "roots" as top level nodes. If the "_root" content item is not found, the taxonomy resolver checks for empty referrers of all taxonomy content items inside a taxonomy folder, to determine which node is a top level node of the given taxonomy tree. In that case, top level node content items must be placed directly within the root folder. Taxonomies of subsequent levels can also be placed in subfolders. The name of the folder in which the taxonomy tree is placed defines the name of the taxonomy tree and is visible as a root node in the taxonomy administration UI.
The lookup folders for taxonomies and the strategy used to build the tree are configured in the
Spring configuration class TaxonomyConfiguration of the
shared/taxonomies module. The bean properties
siteConfigPath
and
globalConfigPath
of the strategyResolver bean configure the folders that are used to find
taxonomies. TaxonomyResolverImpl implements the
TaxonomyResolver interface so that it is possible to implement other
taxonomy detection strategies.

Warning
The default taxonomy implementation (DefaultTaxonomy.java) checks the taxonomy folder for write permissions.
If these permissions are not granted, the taxonomy won't appear in Studio.
Therefore, ensure that taxonomy administrators have Folder rights for taxonomy folders.
How to implement a new taxonomy resolver strategy
The TaxonomyResolverImpl implements the interface
TaxonomyResolver and is injected to the
TaxonomyResource in the component-taxonomies.xml.
For every taxonomy request, the TaxonomyResource instance looks up the
corresponding Taxonomy object using the resolver instance. To change the
resolver strategy, inject another instance of TaxonomyResolver to the
TaxonomyResource.
How to configure the content properties used for semantic strategies
The content properties that are used for a semantic evaluation are configured in the method
SemanticTaxonomyConfiguration#semanticDocumentProperties of the
shared/taxonomies module. The Spring configuration declares the abstract
class AbstractSemanticService that new semantic service can extend from.
The default properties used for a semantic suggestion search are:
titleteaserTitledetailTextteaserText
How to implement a new suggestion/semantic strategy
To add a new semantic strategy to Studio, it is necessary to implement the corresponding strategy for it and add it to CoreMedia Studio.
A new semantic strategy can easily be created by implementing the interface
SemanticStrategy. The result of a strategy is a Suggestions
instance with several Suggestion instances in it. Each
Suggestion instance must have a corresponding content instance in the
repository whose content type matches that one used for the taxonomy.
Blueprint uses CMTaxonomy content items for
keywords of a taxonomy, so suggestions must be fed with these content items. Additionally, a float
value weight can be set for each suggestion, describing how exactly the
keyword matches from 0 to 1. After implementing the semantic strategy, the implementing class
must be added to the Spring configuration, for example:
<customize:append id="semanticStrategyExamplesCustomizer" bean="semanticServiceStrategies" order="1000">
      <list>
      <ref bean="myMatching"/>
      </list>
      </customize:append>
Next the new suggestion strategy has to be added to Studio, so that is selectable in CoreMedia Studio.
Open the file
TaxonomyStudioPlugin.tsAdd an entry to the configuration section that configures the
AddTaggingStrategyPlugin:<taxonomy:AddTaggingStrategyPlugin serviceId="{TAXONOMY_NAME_MATCHING_KEY}" label="{resourceManager.getString('com.coremedia.blueprint.studio.taxonomy.TaxonomyStudioPlugin', 'TaxonomyPreferences_value_nameMatching_text')}" />Make sure that the
serviceIdmatches the one you configured for the implementation of theSemanticStrategy.
How to remove the OpenCalais suggestion strategy
If you want to disable the OpenCalais integration, simple remove the corresponding
AddTaggingStrategyPlugin entry from the
TaxonomyStudioPlugin.ts configuration section.
How to add a site specific taxonomy
The logic how a site depending taxonomy tree is resolved is implemented in the
TaxonomyResolver#getTaxonomy(String siteId, String taxonomyId) method.
To create a new site depending taxonomy proceed as follows:
Open Studio, create and select the site specific folder
Options/Taxonomies/from the library.Create a new sub folder with the name of the new taxonomy.
The location for the new taxonomy has been created now.
To identify the type of taxonomy (such as
CMTaxonomyorCMLocTaxonomy) you have to create at least one taxonomy content item in the new folder. Alternatively, create a_rootsettings content item and link a newly createdCMTaxonomycontent item to the StructListrootsto it.
Once the taxonomy has been set up, additional nodes can be created using the taxonomy manager.
If the new taxonomy does not appear as new element in the column on the left, press the reload
button. It ensures that the TaxonomyResolver rebuilds the list of
available taxonomy trees. The new taxonomy is shown in the root column afterwards, include the
site name it is created in.
Creating site specific taxonomies allows you to overwrite existing ones. For example you create
a new taxonomy tree called Subject for site X and
open an article that is located in a sub folder of site X, the regular
Subject taxonomy property editor on the
Taxonomies tab in CoreMedia Studio will
access the Subject taxonomy of your new site, not the one that is located
in the global Settings folders. The suggestions and the chooser dialog
will also work in the new taxonomy tree.
How to configure the taxonomy property editor for a taxonomy
CoreMedia Blueprint comes with two types of taxonomies:
Subject and Location. The name of the taxonomy
matches the folder name they are located in, which is /Settings/Taxonomies.
When the taxonomy property editor for a Studio form is configured,
these IDs are passed to the property editor, for example
<taxonomy:taxonomyPropertyField propertyName="subjectTaxonomy"
                                                    taxonomyId="Subject"/>
      <taxonomy:taxonomyPropertyField itemId="locTaxonomyItemId"
                                      propertyName="locationTaxonomy"
                                      taxonomyId="Location"/>
As mentioned in the previous section, it is possible to overwrite the existing location or
subject taxonomy with a site depending variant. In this case, it is not
necessary to change the configuration for the property field. The taxonomy property editor will
always try to identify the site depending taxonomy with the same name first. If this one is not
found, the global taxonomy with the given id will be looked up and used instead. For custom
site-specific taxonomy trees, the attribute value taxonomyId must match
the name of the newly created taxonomy folder.
How to configure access to the taxonomy content / taxonomy administration
You can configure the list of user groups that can access the taxonomy manager
in the jangaroo.config.js file of the taxonomy extension.
By default, the following groups are allowed to open the manager:
- global-manager
- taxonomy-manager
- developer
This list can not be customized during runtime. To add or remove access for users, ensure that they are a member of the corresponding groups.
<Struct xmlns="http://www.coremedia.com/2008/struct" xmlns:xlink="http://www.w3.org/1999/xlink">
      <StringListProperty  Name="administrationGroups">
      <String>global-manager</String>
      </StringListProperty>
      </Struct>
To ensure that the taxonomies are working properly, ensure that the user has the corresponding read and write rights to the settings and taxonomy folders. For taxonomy folders, ensure that also the Folder rights are set.
