


Site Manager Developer Manual / Version 2210
Table Of Contents
Using the file editor.xml, you can configure the document overview, that is, the tabular listing of
documents in four windows:
The explorer view in the Explorer window.
The query view in the Query window.
The document overview in the selection window for internal links to resources.
The workflows in the workflow list.
Configuration is the same for all four windows. However, there is the additional possibility in the main window of filtering the documents in the document window.
The example configuration described here for the query window can simply be used for the other windows. Only the
enclosing element has to be changed (Query, Explorer, ResourceChooser,
Search and Workflow are possible).
Creating a query view in the query window
You want to create a query view in the query window which displays the following information:
the document type
the document name
the content of a structured text field
These column definitions are created within the <Query> and <TableDefinition>
tags. Note that the document types and fields given in the following examples do not necessarily exist in
your CoreMedia installation.
In the following examples, the attribute name is used in the <ColumnDefinition> element.
Definition of the table column for the document type
The column should have the name "Type". The minimum width should be 50 pixels and should scale with the width of the window. Enter the following lines in
editor.xml:
<ColumnDefinition name="Type" width="50"
                      class="DocumentTypeColumn"/>
Example 5.59. Example configuration for document type display
In this case it is necessary only to make a few entries, since most of the default values can be used. For example, the default value for
resizableis "true", that is, the column is automatically scaled. It is also not necessary to make anyDisplayMapentries, since the document type is an inherent property of all documents.
Definition of the table column for the document name
The column should have the name "Name". The minimum width should be 150 pixels and should scale with the width of the window. The document name should be displayed in this column for each document. Enter the following lines in
editor.xml:
<ColumnDefinition name="Name" width="150" class="StringColumn">
        <DisplayMap document="*" property="name_"/>
</ColumnDefinition>
Example 5.60. Example configuration for document name display
Mostly default values are also used in this case. However, because there is no special class for displaying the document name (the StringColumn class must be used), you must make
DisplayMapentries. Since the name is defined in all document types, you can enterdocument="*". The document name is accessed viaproperty="name_".
Definition of the table column for the content of a structured text field
The column should have the name "Content". The minimum width should be 250 pixels and should scale if the width of the window is increased. For a document of type "Dish", the content of the description field should be displayed; Enter the following lines in
editor.xml:
<ColumnDefinition name="Content" width="250"
        class="SgmlTextColumn">
        <DisplayMap document="Dish" property="Description"/>
</ColumnDefinition>
Example 5.61. Example configuration for the structured text column
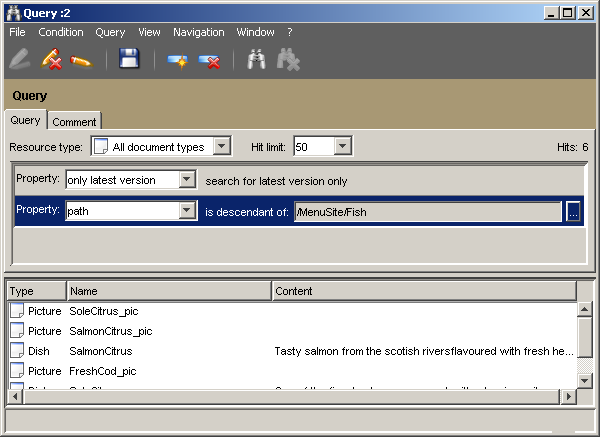
The SgmlTextColumn class is used here for displaying the structured text field (SGML field). One
DisplayMaptags is created for the document typeDish. The next figure shows the configured query window.
Creating filters
You want to make filters for the following documents available via the menu point View|Filter:
Published documents
Deleted documents
Enter the following lines in the editor.xml file:
<Explorer name="configurable-explorer">
        <Filter name="deleted-filter">
                <Predicate class="DeletedPredicate" />
        </Filter>
        <Filter name="unpublished-filter">
                <Predicate class="UnpublishedPredicate" />
        </Filter>
        .
        .
        .
</Explorer>
Example 5.62. Creation of two filters
