Personalization Hub Manual / Version 2412.0
Table Of ContentsTo connect CoreMedia Content Cloud with the Monetate system, you have to connect the CAE and Studio Server with Monetate and configure each site that should use the Monetate connection.
Configuring the Connection
To connect CoreMedia Content Cloud with the Monetate system, proceed as follows:
Create an RSA key pair, for example, with
openssl.Open the Monetate portal and navigate to → → . and create a new API user.
Add the newly generated public key to the API user.
Configure the connection in the
monetate-connector.propertiesfile inp13n-adapter-monetate-lib/src/main/resources/META-INF. There, you will find a description of the properties. An example configuration would look as follows:p13n.adapters.monetate.connectors[0].id=coremedia p13n.adapters.monetate.connectors[0].retailer=coremedia p13n.adapters.monetate.connectors[0].key-string=MIIBrzBJBgkqhkiG... p13n.adapters.monetate.connectors[0].api-user=api-0815-connector p13n.adapters.monetate.connectors[0].tag-uri-template=//se.monetate.net/js/2/{channel}/entry.js p13n.adapters.monetate.connectors[0].analytics-uri-template=https://marketer.monetate.net/ control/{channel}/analytics/{experienceId}/realtime p13n.adapters.monetate.connectors[0].edit-uri-template=https://marketer.monetate.net/control/ {channel}/experience/{experienceId} p13n.adapters.monetate.connectors[0].filterExpressions[0]=(.*)\\$ p13n.adapters.monetate.connectors[0].filterExpressions[1]=(.*)# p13n.adapters.monetate.connectors[0].filterMode=excludeExample 4.6. Example Monetate configuration
Excluding Experiences from Studio
In Section, “Creating Experiences in Monetate” you will learn how to create experiences in Monetate. However, not all experiences in the Monetate system are applicable for use with a CoreMedia Monetate Experience content item, for example, experiences used for segmentation, the 'Final' experience (see Section, “Creating Experience for Content Masking”), which only serves a technical function, and experiences that don't target content (changing layout, for example). These experiences should be hidden from the Studio user and be not selectable in the experience drop-down list.
For this use case, you can apply the properties monetate.connectors[n].filterMode and
monetate.connectors[n].filterExpressions[n] as shown in Section “Configuring the Connection”
Configuring the Site
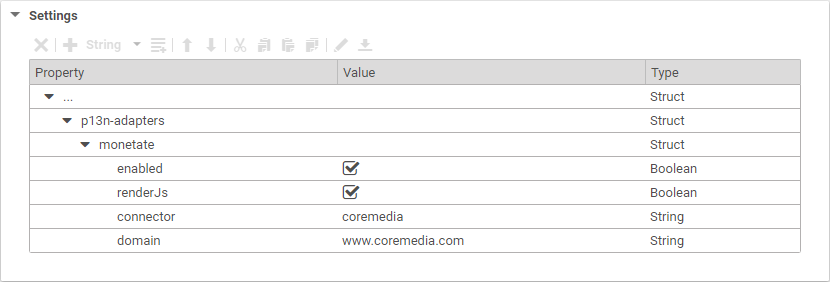
To connect a site with the Monetate system, you have to create a Settings content item
and link to it from the root page of the site. In the Settings content item set the following
properties:
The properties have the following meaning:
| Property | Required | Default | Description |
|---|---|---|---|
| enabled | x |
Enables the Monetate integration for this site. | |
| renderJS | true |
Instructs the CAE to include the Monetate tag in its head section. Disable in a commerce-led scenario where the shop frontend already includes the Monetate scripts. | |
| connector | x |
The ID of the backend connector. See the property | |
| domain | x |
The domain name. Corresponds to a site in your Monetate account. |
Table 4.2. Monetate properties for site connection


