Adding a Welcome Message
Learn how to add a welcome message as an active element in an onsite campaign.
Prerequisites
Before you start:
-
Log in to Engagement Studio with a user that has role
Manager. -
Create an Onsite Campaign. For example,
Engagement Cloud Docs. -
In the Engagement page, open the Onsite Campaign.
Steps
1. Create the welcome message as an active element
-
Edit the
Engagement Cloud Docscampaign in the Engagement page. -
Activate the campaign.
-
Select the Active elements tab.
-
Click + Add.
Window Add element opens. -
Fill the active element information in the Add element window:
-
Element type: Select
Active element. -
Name: Write the name of the element. Give meaningful names. For example,
EC Welcome Message. -
(Optional) Status: Slide the switch to activate the active element.
-
Active Placeholder: Select
-new placeholder-to create a new placeholder for the active element.
-
-
Click Accept in the bottom right corner of the Add element window.
-
Inside the placeholder, click + Add new element.
-
Select the type of active element that you want to create from the Add Element window. For example,
Custom content. -
Fill the Custom content element information:
-
Name: Write the name of the element. For example,
Welcome message. -
Insert HTML (rendered with visitor information): Paste the HTML code for the welcome message.
See the example in the Code example section below.
-
-
Click Accept in the bottom right corner of the Configure Element window.
-
(Optional) Click the switch next to the active element name to activate it.
If you activated the active element in step 6, skip this step. -
Click the placeholder name to define when the active element appears on the site. In this example, we want the welcome message to appear after the visitor stays on the site for 2 seconds, so we select
Time elapsedand enter2seconds. -
Click Save in the bottom right corner of the Edit placeholder window.
-
Click Close in the bottom right corner of the Edit placeholder window.
-
Click Save campaign in the top right corner of the Edit campaign window.
Open the website and wait 2 seconds for the welcome message pop-up to appear. You can customize the welcome message HTML to fit your needs. You can also define other triggers, such as a click on a specific area of the site or an exit intent.
2. Segment the welcome message to show only on the homepage
-
Click the 🔧 icon of the
EC Welcome Messageplaceholder. -
Select the Segmentation tab in the Edit active campaign presentation options window.
-
Slide the switch to activate segmentation.
-
Click + Add condition.
-
Select
URLin the dropdown menu. -
Select
equalsin the dropdown menu. -
Enter the URL of the homepage in the input field. For example,
https://documentation.coremedia.com/engagement-cloud/. -
Click Accept in the bottom right corner of the Url window.
-
Click + Add condition.
-
Select
Number of visitsin the dropdown menu. -
Select
<=in the dropdown menu. -
Enter the number of visits in the input field. For example,
5. -
Select the period from the dropdown menu. For example,
Current week. -
Click Accept in the bottom right corner of the Edit active campaign presentation options window.
-
Click Save campaign in the top right corner of the Edit campaign window.
Result
After you add the welcome message as an active element in the
Engagement Cloud Docs campaign, the website shows the pop-up after 2
seconds only on the Engagement Cloud homepage and only during each new
visitor’s first five visits.
Code example
<meta charset="UTF-8" /><meta name="viewport" content="width=device-width, initial-scale=1.0" />
<title>Documentation Welcome Popup</title>
<style>
body {
font-family: Arial, sans-serif;
margin: 0;
min-height: 100vh;
background: #f7f9fc;
}
.popup-overlay {
position: fixed;
inset: 0;
background: rgba(0, 0, 0, 0.45);
display: flex;
align-items: center;
justify-content: center;
z-index: 9999;
}
.popup {
background: #ffffff;
width: 90%;
max-width: 480px;
border-radius: 14px;
box-shadow: 0 16px 40px rgba(0, 0, 0, 0.18);
padding: 28px 24px;
position: relative;
animation: fadeInUp 0.25s ease-out;
}
.popup h2 {
margin: 0 0 12px;
font-size: 1.5rem;
color: #1f2937;
}
.popup p {
margin: 0 0 18px;
color: #4b5563;
line-height: 1.6;
font-size: 0.98rem;
}
.popup .button-row {
display: flex;
gap: 12px;
flex-wrap: wrap;
}
.popup .btn {
border: none;
border-radius: 8px;
padding: 10px 16px;
font-size: 0.95rem;
cursor: pointer;
transition: background 0.2s ease, transform 0.1s ease;
}
.popup .btn:hover {
transform: translateY(-1px);
}
.popup .btn-primary {
background: #a82c9c;
color: white;
}
.popup .btn-primary:hover {
background: #1d4ed8;
}
.popup .btn-secondary {
background: #e5e7eb;
color: #111827;
}
.popup .btn-secondary:hover {
background: #d1d5db;
}
.popup .close-btn {
position: absolute;
top: 12px;
right: 12px;
background: transparent;
border: none;
font-size: 1.2rem;
color: #6b7280;
cursor: pointer;
}
.popup .close-btn:hover {
color: #111827;
}
@keyframes fadeInUp {
from {
opacity: 0;
transform: translateY(16px);
}
to {
opacity: 1;
transform: translateY(0);
}
}
.hidden {
display: none;
}
</style>
<div class="popup-overlay" id="welcomePopup">
<div aria-labelledby="popupTitle" aria-modal="true" class="popup" role="dialog"><button aria-label="Close popup" class="close-btn" onclick="closePopup()">×</button>
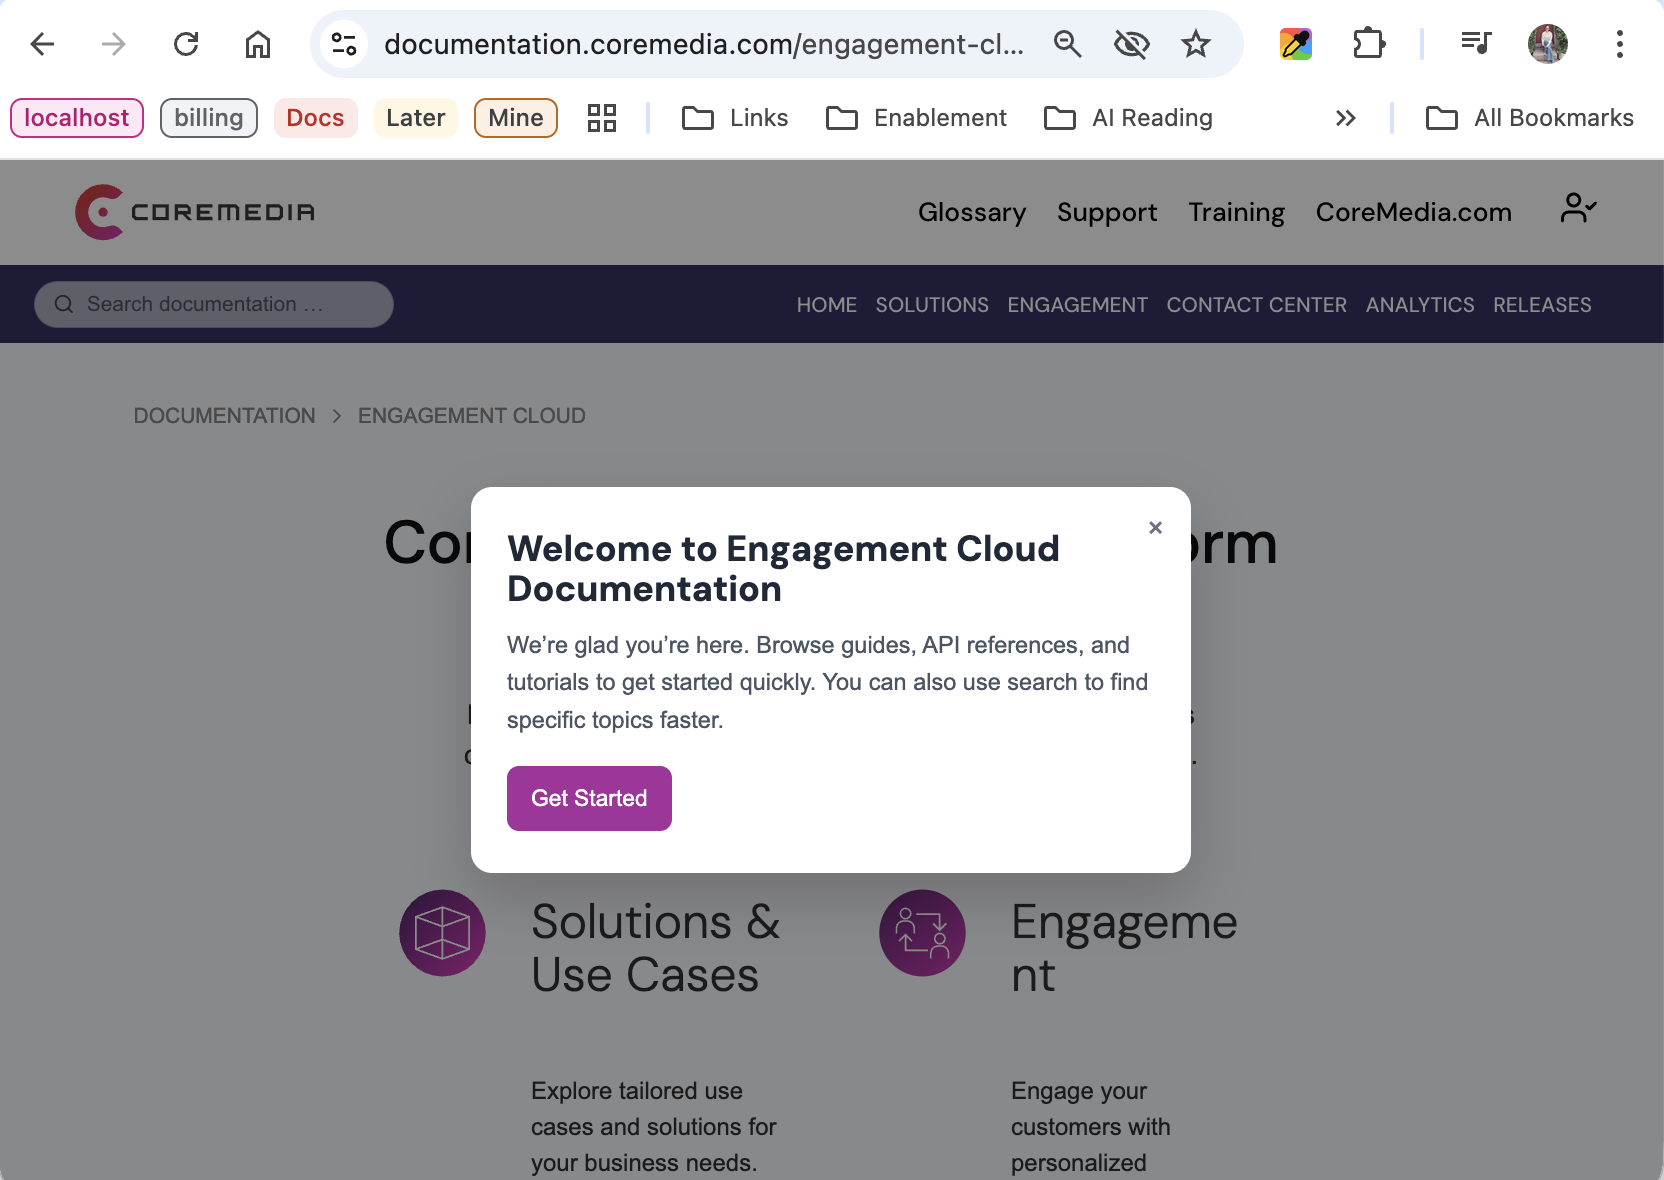
<h2 id="popupTitle">Welcome to Engagement Cloud Documentation</h2>
<p>We’re glad you’re here. Browse guides, API references, and tutorials to get started quickly. You can also use search to find specific topics faster.</p>
<div class="button-row"><button class="btn btn-primary" onclick="closePopup()">Get Started</button></div>
</div>
</div>
<script>
function closePopup() {
document.getElementById("welcomePopup").classList.add("hidden");
}
// Optional: only show once per browser
window.addEventListener("load", function () {
const hasSeenPopup = localStorage.getItem("docsWelcomeSeen");
if (hasSeenPopup) {
document.getElementById("welcomePopup").classList.add("hidden");
}
});
function closePopup() {
document.getElementById("welcomePopup").classList.add("hidden");
localStorage.setItem("docsWelcomeSeen", "true");
}
</script>