


Studio User Manual / Version 2204
Table Of ContentsThis chapter describes how you can hide fields in the form of a specific content type. That is, when you open a content item of this type afterwards, you have only fields which are relevant for your daily work.
Open a content item of the content type you want to customize. For example, an Article
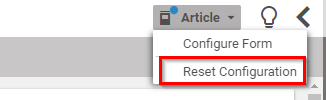
Click on the content type icon button of the content item in the title bar to open the menu and select the Configure Form menu item to open the configuration dialog.
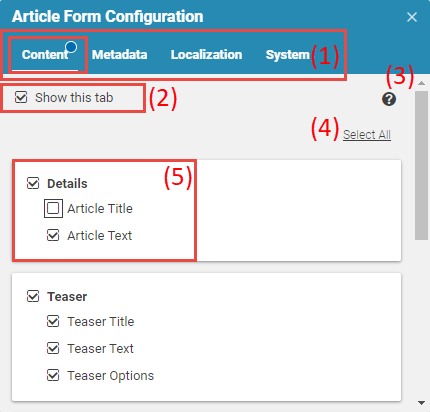
The configuration dialog opens up. All checkboxes are checked for a non-customized content type. That means, all tabs and fields will be shown. Uncheck the checkboxes of tabs, field groups or groups you want to hide.
Once you have hidden one or more components on a tab, a blue dot will be attached to the tab bar (1).
In addition the [Select all] button (4) will be activated. Clicking the button will revert all configurations you've done on the tab so that all the components hidden before will be visible again. The blue dot disappears.
The configuration dialog has the same tabs as the content form itself (1).
You can hide (uncheck) a complete tab by unchecking the Show this tab checkbox (2). Checking the checkbox will make the tab visible again.
You can configure the content form on a deeper level. Unchecking the checkbox Article Title, for example, will hide the RichText field "Article Title" on the content form but not the property field group "Details". You can also hide the whole property field group Details by unchecking the corresponding checkbox. As before checking the checkbox will make the component visible again.
The help icon (3) gives you information about this dialog.
When you've completed the configuration on all tabs, close the dialog by clicking on the "X" at the top of the dialog.

The configuration is now applied to all contents of the same content type, here for all articles.
If a content type is configured, then the content type icon button has a blue dot so that you can easily recognize customized content types.
Reset the Configuration
In order to completely reset the configuration and show all components again, click on the content type icon button of the content item in the title bar to open the menu and select the Reset Configuration menu item to reset the configuration (see Figure 3.32, “Content Form Configuration Button after Configuration”).
If you only want to reset a specific tab, property field group or field open the configuration dialog and check the corresponding checkboxes.
