Studio User Manual / Version 2110
Table Of ContentsWhen you have derived a synchronized site, you have to keep it in sync with the master site. To do so, you use the Synchronization workflow.
In order to synchronize the changes you have applied at the master site, do the following:
From the master site, select the content items which have changes that you want to synchronize with the derived sites.
Open a localization workflow window as described in Section “Starting Workflows”.
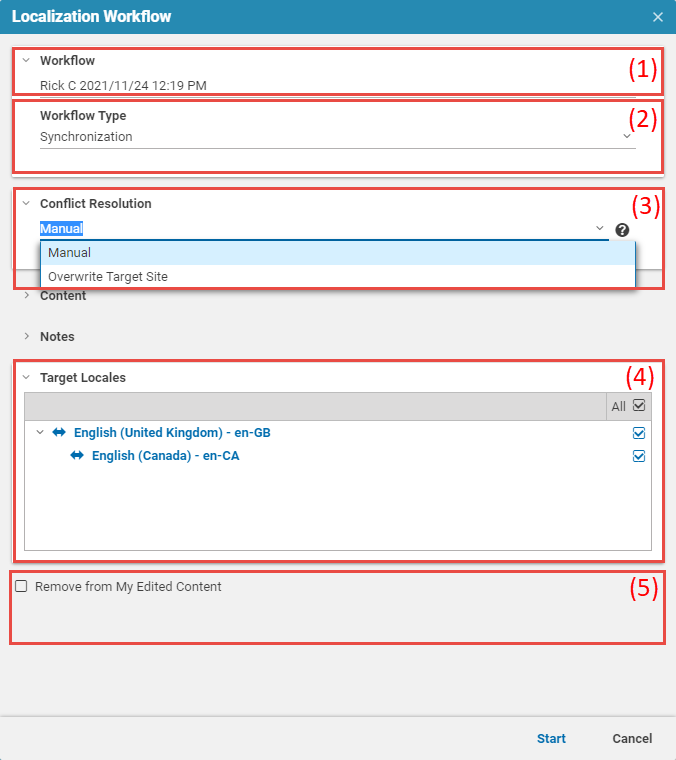
In the Workflow Type field (2) select the Synchronization workflow.
Edit the workflow:
Content in a synchronized site is not locked or secured in any way. That is, you can edit content of a synchronized site like any other content. However, when both the master content and the content of the synchronized site have changed, then there is a conflict. Select one of the following solution strategies from the Conflict Resolution Strategy field (3):
Manual
When there are conflicts, the workflow escalates. You have to resolve the conflict and start the synchronization again. You can use the Side-by-side view to compare both versions (see Section 4.7.3, “Comparing Translation” for details).
Overwrite Target Site
When there are conflicts, the content of the master site will overwrite the conflicting content of the synchronized site.
You can change the name in Workflow (1),
You can choose to remove master contents from My Edited Content (5) by selecting the Remove from My Edited Content checkbox. This setting will be remembered in the user preferences.
You can exclude sites from the synchronization in the Target Locales field (4). By default, all synchronized sites are selected. When you exclude a site, then all subsites are also excluded and when you include a subsite, then all parent sites are also included.
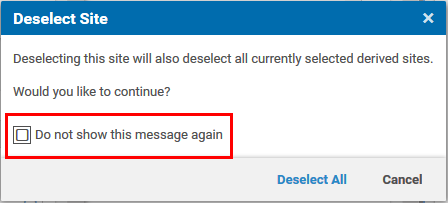
When you exclude a site that has included subsites, a warning dialog opens up. Click [Deselect All] to deselect all subsites. You can disable the warning by checking the Do not show this message again checkbox. You can enable the warning again in the Preferences dialog (see Section 3.3.14, “Configuring Warnings”).
Click [Start] to start the synchronization workflow. The workflow runs without further user interaction.
The changes are applied to all selected synchronized sites and the changed items appear in the My Edited Content field from where you can publish the changes.

Note
Keep in mind that properties are not synchronized, when you have unchecked the Keep synchronized with Master
checkbox of the content (see Section 4.7.5.3, “Removing Content Permanently from Synchronization”) or for which your developers have set the
extensions:automerge attribute to false in the content type model.


